Quantcast
Channel: ATeam Chronicles
Viewing all 31 articles
Browse latest View live

Bearer Confirmation Method (Huh! What is it good for…)

$
0
0

For starters, allow me to introduce myself. My name is Brian Eidelman and I am a new member of the Fusion Middleware Architecture Group (a.k.a the A-Team) and a new contributor to this blog. Since the memo has gone out that in addition to security we will be discussing dogs now, I’d like to introduce my faithful companion Coco.

Now without further ado, my post:

The WSS SAML Token Profile Specification defines several “confirmation methods” by which the contents of the SAML assertion can be linked to the SOAP message content itself. In other words the method of proving that the assertion really goes with the message that it is being sent in.

The “bearer” confirmation method is sort of peculiar in that it defines no process at all for proving the link between the contents of the assertion and the message content. Rather, the link is to be implicitly trusted.

At this point you may be saying to yourself, if there is no means of verifying that the SAML assertion goes with the message, then what good is it?

Well, the trust can be implicit for any number of reasons. It could just be that trusting developers created the service. More likely however, the link between the SAML assertion and the message can be implicitly trusted by the service because the integrity of the link has been delegated to some other external factor; usually to the network level.

In some cases we could be talking about an internal network setup so that all requests to the service are guaranteed to come from a tamper proof trusted client (if you aren’t buying into this, just humor me). In other cases we could be talking about SSL with 2-way authentication. The point is that the service can trust that only a proper trusted client can successfully get a message to it in the first place.

Now at this point you might be thinking to yourself, fine but then how is SAML with bearer confirmation different than just including a username token with no password in the message header.

Well, SAML with bearer confirmation offers a few additional advantages over the plain old username token. Foremost, the assertion can contain not just a username (subject) but also a bundle of attributes that can further serve to identify the user, define a users’ roles, or be otherwise consumed by the service. In addition, the assertion does capture the notion of what entity is “issueing” the assertion (asserting the user identity). Lastly, some SOA stacks may not be able to handle a username token with no password.

So after all that, what is the bearer confirmation good for? Given that it allows us to utilize assertions without the hassles and costs that come with the signing and key references that are a part of the other confirmation methods, bearer is the perfect confirmation method for basic identity propagation to or between internal services. A similar use case where bearer may fit the bill is identity propagation from trusted intermediary that maybe be doing the real authentication to the service over a securely established network connection.


SAML Bearer Confirmation – An example using OWSM Client Policy

$
0
0

Introduction

This is an extension of the discussion started by Brian in his inaugural post here at the FusionSecurity blog. Brian and I, along with other members of the A-Team were out at HQ getting some training on the SOA Security capabilities in 11g, and I wanted to share a useful “How-To” from that week.

Main Article

First, let me show you the code, and then I’ll take you through the code in some details and explain the additional set-up required to make this use case work. Basically, the code is for a stand-alone Java client using OWSM client policies to enable a JAX-WS Web Service Proxy to use SAML Bearer over SSL – quite a mouthful!

The Code

package com.oracle.team2.view;  

import java.net.URL;  
import java.security.AccessControlContext;  
import java.security.AccessController;  
import java.security.PrivilegedAction;  
import javax.security.auth.Subject;  
import javax.security.auth.callback.CallbackHandler;  
import javax.security.auth.login.LoginContext;  
import javax.xml.namespace.QName;  
import javax.xml.ws.WebServiceFeature;  
import javax.xml.ws.WebServiceRef;  
import oracle.security.jps.JpsContext;  
import oracle.security.jps.JpsContextFactory;  
import oracle.security.jps.service.login.LoginService;  

public class MyWebServicePortClient {  
@WebServiceRef  
private static MyWebServiceService myWebServiceService;  

public static void main(String[] args) throws Exception {  

URL localURL =  
 new URL("https://.../MyWebServicePort?WSDL");  

QName name =  
 new QName("http://view.team2.oracle.com/", "MyWebServiceService");  

myWebServiceService = new MyWebServiceService(localURL, name);  

JpsContextFactory factory =  
 JpsContextFactory.getContextFactory();  

JpsContext jpsContext = factory.getContext("Client");  
LoginService loginService =  
 jpsContext.getServiceInstance(LoginService.class);  

CallbackHandler cbh = new MyAssertionCallbackHandler("josh");  

String[] selectiveModules = new String[] {  
    "user.assertion.loginmodule"  
};  
LoginContext ctx =  
    loginService.getLoginContext(new Subject(), cbh, selectiveModules);  
ctx.login();  
Subject s = ctx.getSubject();  

final weblogic.wsee.jws.jaxws.owsm.SecurityPolicyFeature securityFeature =  
   new weblogic.wsee.jws.jaxws.owsm.SecurityPolicyFeature(  
"policy:oracle/wss_saml_token_bearer_over_ssl_client_policy");  

Subject theSubject =  
  Subject.getSubject(AccessController.getContext());  

System.out.println("The Subject is " + theSubject);  

AccessControlContext acc =  
 AccessController.getContext();  

Subject.doAs(s, new PrivilegedAction() {  

 public Object run() {  
   WebServiceFeature[] features =  
     new WebServiceFeature[] { securityFeature };  

   MyWebService myWebService =  
     myWebServiceService.getMyWebServicePort(features);  

   // Add your code to call the desired methods.  
   System.out.println(  
myWebService.helloThere("From a Java client"));  

   return "done";  
 }  
});  

}  
}

The Explanation

We’re applying OWSM client side policy, that requires a SAML Assertion – Bearer and that the request is over SSL. The SSL implementation is the standard J2SE and OWSM uses the JAAS Subject for the identity. The policy is applied via the WebServiceFeature and is described in the OWSM documentation.

Basically, we’re using OPSS inside of a J2SE client to establish the JAAS Subject, without providing a password. I used the OPSS documentation as a reference. I used exactly the MyAssertionCallbackHandler from the documentation.

The final “trick” is that the call to the web service is done inside of a call to Subject.doAs(Subejct,PriviledgedAction). This pushes the Subject from the LoginModule on to call stack, and makes it available for the OWSM policy.

The Configuration

So, there a few command line arguments that need to be passed to this client:

-Djavax.net.ssl.trustStore=truststore -Djavax.net.ssl.trustStorePassword=123456

There are the standard J2SE SSL parameters. The JAX-WS client uses the standard SSL.
In my example, I just used the DemoIdentity and DemoTrust, so I set my -D’s to

-Djavax.net.ssl.trustStore=C:\\Oracle\\Middleware\\wlserver_10.3\\server\\lib\\DemoTrust.jks -Djavax.net.ssl.trustStorePassword=DemoTrustKeyStorePassPhrase

You also have to pass the program the location of the jps-config.xml.

-Doracle.security.jps.config=c:\jps-config-jse.xml

The jps-config.xml defines the Oracle Platform Security (OPSS) services used by the client. In our use-case, we’re going to be using the LoginService to establish an identity for the client. I got the basis of the jps-config-jse.xml from DOMAIN_HOME\config\fmwconfig\jps-config.jse.xml.

At the end of this file, you need to add a jpsContext called Client that contains a reference to the user.assertion.loginmodule

<jpsContext name="Client">  
<serviceInstanceRef ref="user.assertion.loginmodule"/>  
</jpsContext>

The user assertion login module allows the client to create an identity for the user with no password. It won’t work with any username – the user still has to be found in the identity store, which in this case is stored inside of the system-jazn-data.xml. By default, the login module is looking for the system-jazn-data.xml found in the same directory in the jps-config.xml.

I found the system-jazn-data.xml reference useful in building this file:

<jazn-data>  
  <jazn-realm>  
    <realm>  
      <name>jazn.com</name>  
      <users>  
        <user>  
          <name>josh</name>  
          <guid>1</guid>  
        </user>  
      </users>  
    </realm>  
  </jazn-realm>  
</jazn-data>

The final, configuration step is to make sure that the user that you’re asserting – in this case “josh” exists on the server side in WLS. You can just add the user via the WLS admin console.

The Wrap Up

This is definitely a little tricky, but it demonstrates how to use a SAML Bearer assertion. There is no PKI required on the client side – simply the ability to trust the server at the transport level. This is pretty straight forward and simpler then setting-up either sender-vouches or holder-of-key. Consider using this type of approach from within a trusted network.

OWSM Client Policies and SAML – Simpler is Better

$
0
0

Introduction

Classic example of me being “too clever by half”.

Main Article


From the OWSM Documentation

Looks like you can just set the username as a property

URL localURL =  
    new URL("https://.../MyWebServicePort?WSDL");  

    QName name = new QName("http://view.team2.oracle.com/","MyWebServiceService");  

  myWebServiceService =  
    new MyWebServiceService(localURL,name);  

  final weblogic.wsee.jws.jaxws.owsm.SecurityPolicyFeature securityFeature =  
        new weblogic.wsee.jws.jaxws.owsm.SecurityPolicyFeature("policy:oracle/wss_saml_token_bearer_over_ssl_client_policy");  

  WebServiceFeature[] features =  
    new WebServiceFeature[] {securityFeature};  

  MyWebService myWebService =  
    myWebServiceService.getMyWebServicePort(features);  

  Map<String,Object>  reqContext = ((BindingProvider) myWebService).getRequestContext();  
  reqContext.put( BindingProvider.USERNAME_PROPERTY, "jdoe");  

  // Add your code to call the desired methods.  
  System.out.println(myWebService.helloThere("From a Java client - JDOE"));

This “AH HA” eliminates the need for the code to get the JAAS Subject and the configuration of the jps-config.xml and system-jazn-data.xml. Much better.

Just to round out, here is the client for SAML sender-vouches.

URL localURL = new  URL("http://oamwindows:7001/Team2-ViewController-context-root/MyWebServicePort?WSDL");  

    QName name = new QName("http://view.team2.oracle.com/","MyWebServiceService");  

  myWebServiceService =  
    new MyWebServiceService(localURL,name);  

  final weblogic.wsee.jws.jaxws.owsm.SecurityPolicyFeature securityFeature =  
        new weblogic.wsee.jws.jaxws.owsm.SecurityPolicyFeature("policy:oracle/wss10_saml_token_with_message_integrity_client_policy");  

  WebServiceFeature[] features =  
    new WebServiceFeature[] {securityFeature};  

  MyWebService myWebService =  
    myWebServiceService.getMyWebServicePort(features);  

  Map<String,Object>  reqContext = ((BindingProvider) myWebService).getRequestContext();  
  reqContext.put( BindingProvider.USERNAME_PROPERTY, "jdoe");  

  reqContext.put(ClientConstants.WSSEC_KEYSTORE_LOCATION, "c:/wstest/alice.jks");  
  reqContext.put(ClientConstants.WSSEC_KEYSTORE_PASSWORD, "password" );  
  reqContext.put(ClientConstants.WSSEC_SIG_KEY_ALIAS, "alice" );  
  reqContext.put(ClientConstants.WSSEC_KEYSTORE_TYPE, "JKS" );  
  reqContext.put(ClientConstants.WSSEC_SIG_KEY_PASSWORD, "password" );  
  reqContext.put(ClientConstants.WSSEC_ENC_KEY_ALIAS, "alice" );  
  reqContext.put(ClientConstants.WSSEC_ENC_KEY_PASSWORD, "password" );  
  reqContext.put(ClientConstants.WSSEC_RECIPIENT_KEY_ALIAS,"bob");  

  System.out.println(myWebService.helloThere("From a Java client"));

I did all of my testing with the demo CA that ships with WebLogic Server. I find the CertGen and the ImportPrivateKey
tools to be really useful in building small samples. I created two keystores – alice.jks and bob.jks. Alice for the client and Bob for the server. This is all standard stuff, but one thing to remember that OWSM has only a single identity and trust store…not separate stores as in J2SE or WLS, so I had to add the CertGenCA.der to both keystores.

Beyond on that, really pretty simple. I configured the bob.jks keystore for the WebLogic Server Domain from EM – Domain (Right Click) -> Security -> Security Provider Configuration. Scroll down to Keystore…configure bob.jks as the store. Restart the server. Send the message and it just works!

OWSM stand-alone Client to OWSM Server doing SAML Bearer and SAML Sender-Vouches – check!

SAML, REST, smart phones and you

$
0
0

(or Smart devices, not so smart protocols)

I’ve been working on and off with a customer on a project that involves all sorts of cool buzzwords – iPhone/Android/Blackberry Apps as clients, using REST to invoke Web Services, authenticating via SAML. While I can’t go into the details or reveal too much about the project there is one line of discussion that is really interesting.

First the background:

A thick client, running on a smartphone, will do some sort of handshake with one web server to authenticate the user.
Once the user is authenticated that server will issue the user a SAML Assertion.
The client will then use the SAML assertion to authenticate to a different server and will send REST-style requests to invoke services on that server.

So something like this:

Screen+shot+2010-03-31+at+4.20.20+PM

This begs the question why not just use a conventional web SSO product like Oracle Access Manager? An excellent question, the short version of which is that the Authentication Server and the REST Server are run by two different companies and don’t share any infrastructure (a more common situation than you might think).

SAML actually solves a whole bunch of painful problems in this architecture – the AuthN server can sign the SAML Assertion to prove its validity and protect it from alteration and encrypt it to prevent the user from even seeing its contents. SAML also allows the AuthN server to send additional information about the user (i.e. attributes) in an extensible way – and additional attributes can be added later without needing to change any infrastructure, communication protocols or even the client.

Did you fill up your Buzzword bingo card yet?

So moving on to the problems…

Transmitting the SAML Assertion
If we were using SOAP to go from the device to the server WS-Security would have solved all of our problems. That standard spells out exactly how to attach a SAML assertion to a SOAP message so that both the client and server can understand. Unfortunately almost all “smart” devices lack a full SOAP stack. Further complicating matters is the fact that REST is a (air quote) “standard” intended to be a very lightweight way to send requests to a server and get back a structured response. Because it’s intended to be so much simpler than SOAP there’s very little (read no) standards around things like authentication, encryption, signing or any of the things that make SOAP a bit complicated at times.

All of which is just a long way to say that you’re basically on your own figuring out how to use SAML with REST.

There are a few obvious options of how to use SAML with REST.

  1. Send the SAML assertion to the server and swap it for a cookie. Your deployment then becomes nothing more than a standard web SSO situation and your application doesn’t need to worry about the SAML bits.
  2. Send the SAML assertion in every request as part of the POST data. This places the responsibility for parsing the SAML assertion into your application logic or something that can see and handle the HTTP POST data stream.
  3. Send the SAML assertion in every request as an HTTP header. This is a slight variant of #2 that is more similar to SOAP’s WS-Security model where the authentication information is separated from the actual input/output parameters of the call.

I like option 1 because it pushes handling the SAML assertion out of scope, or in other words into an S.E.P. On the other hand having a thick client interacting and cooperating with a web SSO solution introduces a whole raft of other issues including properly handling things like idle and session timeouts, dealing with redirects, and a long list of others. Web SSO products were designed to interact with web browsers and their ‘on the wire’ behavior can be difficult to understand from an HTTP client’s perspective. I’m not convinced that this is the best solution to our problem so on to options 2 and 3.

Option 2 and 3 are nearly identical – differing only in where the assertion goes in the HTTP request. That subtle difference is actually kinda a big deal and after thinking about it for a while I think I vastly prefer option 3 to option 2. Besides the logical separation of authentication and inputs I have a few other reasons, such as the fact that POST data can only generally be consumed once which is really important for my next trick.

You probably know about Servlet Filters, and if you’ve been reading this blog for a while you probably know about WebLogic’s security framework (often called the SSPI framework). What you may not know about is how to put them together into a Servlet Authentication Filter. Basically you write a Servlet Filter that takes on responsibility for getting the authentication token and then ask WebLogic to go call the authentication provider for you. If everything works out WebLogic goes ahead and establishes a session for you. Then when your actual service wants to know who is invoking the service it can ask by calling weblogic.security.Security.getCurrentSubject().

No fuss no muss. And most importantly you don’t have to commingle service logic with any code to deal with SAML, encryption keys, XML parsing or anything else unrelated to actually doing your actual work!

Session Management
One of the concerns with sending the SAML assertion along with every request is the performance impact of the XML and crypto operations. If you are invoking a simple service (hello world for example) the overhead of all of the SAML seems like it might be awfully expensive. If you had to pay that price with every request the overhead would quickly eat up your CPU cycles grinding even a reasonably fast machine to a halt under load.

Thankfully WebLogic’s designers thought about this very problem.

The first and most obvious solution is to act just a little bit more like a browser. When you authenticate to Weblogic it automatically creates a session for you and sends a cookie (usually named JSESSIONID) back to your browser. If you include that cookie with subsequent requests there’s no need to authenticate again. So if you smarten up the client so that it handles cookies gracefully you’ll avoid WebLogic having to re-parse and validate your SAML assertion. In fact if I’m reading the relevant iPhone SDK docs (just to cite one example) correctly I think the iPhone SDK handles cookies properly for you automatically by default! Android includes Apache HttpClient which makes cookie handling almost trivial. And as for Blackberry, well it’s J2ME which means you’ll have to do cookie parsing by hand; which, while unfortunate, isn’t the end of the world.

As long as you do the right thing with the cookies coming from WebLogic your session will be fine. If something happens to your session (e.g. the server gets rebooted, you get shunted off to another server that doesn’t know about your session, your session times out, etc) the auth filter will automatically reestablish a session as long as your SAML assertion is still OK.

But that’s only one part of the solution. If you disable WebLogic’s issuance of cookies or you choose to not handle cookies in your thick client’s code WebLogic has still got your back.

Weblogic’s Identity Assertion Cache
Decrypting a chunk of XML, parsing it, and extracting some data takes some CPU cycles, but isn’t all that slow. Searching an LDAP directory to find a user, then doing another search to chase down all of the group memberships on the other hand takes real, measurable clock time. Some of the time is because you’re doing a search and some is because you’re going over a physical wire to talk to the LDAP server and those wires (AFAIK) are still subject to the laws of physics.

The WebLogic docs describe the setting in some detail. The Javadoc for the Authentication Provider says:

The assertIdentity() method of an Identity Assertion provider is called every time identity assertion occurs, but the LoginModules may not be called if the Subject is cached. The -Dweblogic.security.identityAssertionTTL flag can be used to affect this behavior (for example, to modify the default TTL of 5 minutes or to disable the cache by setting the flag to -1).

And the command line reference fills in some more details:

When using an Identity Assertion provider (either for an X.509 certificate or some other type of token), Subjects are cached within the server. This greatly enhances performance for servlets and EJB methods with tags as well as for other places where identity assertion is used but not cached (for example, signing and encrypting XML documents). There might be some cases where this caching violates the desired semantics.

Wrapping it all up

So to summarize:

  • SAML is cool
  • smart devices are pretty cool, but they lack a SOAP stack
  • WebLogic’s SSPI framework is cool
  • the WebLogic engineering team thought of darn near everything

Oh, and if you combine a Servlet Auth Filter, the SAML SSPI Identity Asserter, a teensy bit of code to handle cookies on the client side you can do some pretty clever things.

Got a comment or question? Let me know below!

—-
Update: After having this up a few days I had a talk with someone out of band that in effect said “you said #1 is probably not the best way, but then you went through a whole discussion about 2/3 but wound up describing #1 and saying that it was best.” So I obviously need to clarify.

What I was talking about in #1 is actually invoking a specific server. In other words login(String SamlAssertion) and have a token come back. The problem with that solution is that it’s complicated and if the token isn’t acceptable for some reason you need to know how to go back and get a fresh token.

In the rest of the post I describe sending the SAML Assertion on every request and doing “the right thing” when it comes to cookies. If the server sees the cookies and can find the associated session it won’t bother checking the SAML assertion. If you don’t have a cookie, the cookie or session is invalid or something else goes wrong then the server will go ahead and validate the SAML Assertion and establish a new one.

Hope that clears things up.

SAML is good, but it’s no replacement for WAM

$
0
0

My recent posts about SAML got me thinking about a couple of common misconceptions I see from customers surrounding the technology.

The first and most important misconception is articulated by this quote:
“there is no SAML Fairy”
– Brian Eidelman

In other words there’s nothing magical about SAML. Browsers don’t “speak” SAML. SAML isn’t like an HTTP cookie (and it’s not like a chocolate chip one either, but I digress). SAML is just a means to convey identity from one place to another, so adding SAML into your architecture doesn’t do anything to make it more secure. Application sessions will still be managed with cookies, hidden form fields, information in the query string or whatever it is that the app already did.

The other misconception / misunderstanding is that SAML can take care of all of your SSO problems. Or as a customer recently put it “if I just setup one authentication point for my enterprise and then use SAML to sign onto all of my applications I don’t need a Web SSO solution like [OAM, OpenSSO, SiteMinder, etc]“. This product space is usually called Web Access Management, abbreviated as WAM, which is pronounced like, but is unrelated to the band with a similar sounding name.

I’ve seen this same idea discussed by customers, application vendors and others so it seems pretty common. The fact the idea is common is bad, but it’s the fact that it’s both wrong and widespread that concerns me, and is why I’m writing this post.

The motivations people have put forward for using SAML in this way have included:

  • using “the standard”
  • only having thing to integrate to get SSO for everything
  • lots of applications support SAML out of the box
  • simplifying the environment
  • loosely coupling infrastructure components

and of course…

  • avoiding license costs

From a customer’s perspective these are all valid desires and laudable goals. Unfortunately the reality is that SAML is simply not a replacement for a true web access management solution. The WAM space is one of those classic “elephant in the distance” problems – it’s a whole lot bigger than you think it is when you start.

The main features of a WAM product (according to Wikipedia) are:

  • Authentication Management
  • Policy-based Authorization
  • Audit & Reporting Services (optional)
  • Single sign-on Convenience

Authentication Management includes obvious things like checking a username and password (i.e. HTTP Basic authentication or from an HTML form) or Certificates. It also includes features like requiring different authentication methods for different resources. The rest of the above are fairly self explanatory. I’d add a few more features that are common across most of the products in the space:

  • Session management – including enforcing maximum session time, idle timeouts, administratively terminating a session, etc
  • Security in depth – e.g. securing at least both the web tier and the app tier

If you use SAML for SSO you can centralize authentication, and if you do things carefully you can almost certainly get a limited form of Single Sign-On working. But trying to get most of the other items on my lists above is actually a whole lot harder than you might think.

Consider the use case where you have two applications protected with either a WAM solution or some sort of SAML integration. With a conventional WAM product you’d be able to log into either one and move back and forth seamlessly; your session would be active on either one or both apps for as long as specified in the central configuration and if you log out of one you would be logged out of all. Contrast this with the SAML solution…

You could do central login by configuring the existing login page of each application to kick off a Service Provider initiated SSO, and as long as your session was live at the central IdP you could go back there to get an assertion for the application. Of course you’d need to make sure that the central session didn’t time out too early or you lose all SSO capabilities. You could also configure SAML to support Single Logout (SLO), though doing SLO across more than a handful of Service Providers gets problematic quickly.

So what are you missing? Lots of stuff…

  • Authentication technologies. WAM products generally support a wide variety of authentication methods out of the box. From the common username and password, certificates, smart cards, SecurID and Kerberos to less common things like biometrics and multifactor methods. Enabling additional authentication method with a WAM product generally requires simply following a set of documented configuration steps. Contrast this with what most people think of as how they’ll “do” a SAML IdP for their internal SSO project… a web app deployed on an app server. In that case you’ll be able to support username and password, certificates, probably Kerberos and not much more very easily (for appropriate values of “very”). Further you start running into problems when you try to configure one web application to require more than one method – J2EE apps, for example, can only support one authentication method.
  • Idle timeouts across the environment. Idle timeouts can’t be enforced because SAML doesn’t include a profile for session synchronization. Period. End of statement. Simply not possible with SAML. So once a user SSOs over to an SP there’s no way to let the IdP know that the user is still actively using the app.
  • Session time limits. Maximum session time limits generally can’t be enforced because SAML only specifies a time period during which an assertion will be valid (NotBefore and NotOnOrAfter). The SAML specification does include another attribute (SessionNotOnOrAfter) which is supposed to specify the maximum session time the SP should allow. In my experience this support is generally poorly implemented in all but the most advanced SAML-supporting products. Anecdotally and FWIW I’ve gone to a number of interop test events and I’ve never actually seen this feature included in the conformance test suite. Caveat emptor!
  • Central authorization policies. WAM products include “course grained access control” features. You generally wouldn’t use a WAM product to secure individual features of an application, but using a WAM product to decide who is allowed to reach each application is common.
  • Central Authorization Reporting. Centralizing policies means that you can easily figure out who is going to have access to each application. You can then use this information to generate useful things like attestation reports which are often required by security auditors.
  • Central auditing. When a WAM product is deployed across applications you gain the ability report on who can do what (above) but also the ability to centrally track usage (who actually did what?). Most products will record user actions in flat files, a database, or both. Generating reports from that data then becomes a simple matter of pointing your reporting system at that data and clicking “Generate Report”.

There are some other important features of WAM products, but those are the ones that come to mind immediately.

Then in addition to all of the features you’re missing you introduce a bunch of additional problems. Such as? How about the fact that each Service Provider requires an x.509 certificate? And the fact that setting up a SAML Service Provider is still painful (even with the Metadata exchange protocol). And the fact that when you stand up a new SP you have to configure settings on the IdP.

None of which you have to worry about with a WAM product.

So when it comes to web browsers use SAML for the things it was intended to do – propagating identity across boundaries. And use WAM products for your intra-company SSO.

Do you disagree? Are you using SAML for your web SSO solution successfully? Have you figured out something I haven’t?
Let me know below.

Do I Need to Secure My Service?

$
0
0

Introduction

I sometimes get asked by customers whether they need any security at all for their “internal services”. I wanted to take a post to examine this subject.

Let’s take the simplest case possible from a security vantage point: a synchronous web service being called from a limited number of trusted internal clients (let’s say web applications). Because the web service is synchronous we don’t have to worry about the request sitting in a queue unprotected. Likewise, because the web service is being called from a limited number of internal clients we might be inclined to care less, if at all, about ensuring that users/clients are authorized to call the service. Finally, we will assume that there is no requirement to authenticate a “user” of the client invoking the service.

At the same time we will assume that the service is a “high value” service such that exposing it to the “outside” without security would be a mistake.

So, does such a service need security?

I think to answer this question we have to look at all the possible security concerns for such a service and how they can be addressed with or without explicit security. Usually, when a customer implies that their service doesn’t mean security what they are really saying is that the boundaries of their physical network providing all the security they need. So, let’s look and see to what extent that may be true.

The security concerns for an internal, synchronous service are as follows:

1) Client trust: ensuring that only authorized users/clients are invoking the service.

There are two types of potentially unauthorized clients to worry about, internal clients and external clients.

To protect against external client access physical network boundaries may be sufficient.
However, in my experience an increasing number of customers are not comfortable relying on their physical network.

Without additional security, the only protection against unauthorized internal access to your services is the trust and good will of the users that have access internally.

Two-way SSL is a straight forward, easy to deploy security solution that you can add to your web service that provides strong protection against all types of unauthorized client access. Note though, that one-way SSL does nothing to help with this case.

2) Service trust: ensuring that the service being invoked by consumers of the service is authentic; that it is not a Trojan horse service.

The physical network does provide some level of protection here in that a malicious Trojan service would have to be accompanied by IP address spoofing or DNS hacking to do damage. The greater danger might be the standing up and advertising of an unauthorized service for a SOA phishing attack.

Here SSL (technically just one-way) can help ensure that only authorized services are being called by clients.

3) Message integrity: ensuring the message has not been tampered with.

The physical network can limit the potential for capture, alter, and replay attacks to internal users but SSL can be added to eliminate all risk associated with capturing messages over the wire.

4) Message confidentiality: ensuring that the information in the message cannot be intercepted and read.

The physical network can limit the potential for message capture to internal users but SSL can be used to eliminate all risk of capture over the wire.

5) Tracking and reporting: ensuring that the ability exists to track specific requests/transactions to a specific user/client.

Without additional steps the only tracking mechanism provided by the physical network is the IP address of the client which may or may not be of use.

When you add 2-way SSL with each client getting a unique client certificate, you now have definitive record of which client made which request.

6) Identity propagation
If there is a requirement to propagate the identity of the user of a web application onto the web service then there is potentially additional security required.

Given the assumptions made at the beginning that the consumers of our service are trusted internal clients, we will assume that we can trust them to propagate whatever identity they want. Still, the propagation has to be done in some fashion.

Here we have 3 options:
1) The identity could be added through a custom HTTP header. This is easy on the client and secure if we trust the client and are using 2-way SSL at the transport (the header can be encrypted with symmetric cryptography for added security). On the downside it is very non-standard and will most likely require some custom work on the service side to accept an identity from a custom header.

2) The use of a real WSS Security header such as a SAML assertion. Using SAML with the bearer confirmation method (http://fusionsecurity.blogspot.com/2009/09/bearer-confirmation-method-huh-what-is.html) provides a more standard way of propagating a user identity. With bearer, no messy signing or encryption is required and given our assumptions the security of bearer is probably sufficient if 2-way SSL is being used. The only gotcha is you have to have client and server side stacks that can both “speak” SAML bearer.

3) Many customers ask/talk about just putting the user identity in the body of the message. In many ways this is the easiest thing to do. I also think it makes sense if the business logic of the service will actually make use of the user identity information; as would be the case for a “process insurance selection” or “purchase ticket” service. The only thing to understand is that putting user identity information in the message body means including it in the schema and explicitly coding how to retrieve it in the service. If you rely on WSS security for user propagation then the user identity can be left out of the schema and the service can be coded just to get the identity from the container.

When identity propagation comes up in these conversations, the discussion usually centers on using SAML vs. just putting the user info in the message body. The key deciding factors here are whether the user info will be used by the business logic of the service, whether you want to include the user info in the schema or not, and whether you are comfortable with the code of the service itself retrieving the user identity from the message or whether you’d rather rely on getting the user identity from the container.

Summary

On a very restrictive physical network where trust in the users that have access to the network is very high, it may be OK to deploy a high value web service without additional security. However, most of the time it is a good idea to utilize 2-way SSL to provide strong transport level security.If identity propagation is required a judgment call needs to be made on how to propagate the identity and whether or not to do so through transport security, WSS message level security, or just in the body of the message.

Keystores and signing your SAML assertions

$
0
0

I’ve been working on a project recently that includes SOAP clients submitting messages via JMS and HTTP to Oracle Service Bus (OSB). OSB is supposed to validate the assertion, perhaps do some transformations on the SOAP, and then send the message off to some backend service. I’ll probably talk about the last two thirds of the solution at some point in the future, but it’s the first third that has raised a bunch of questions that other people probably have too.

Before I go into the details let me just remind you that the details here are specific to this customer’s situation. I’m not advocating for, endorsing or otherwise suggesting that the info here is useful to YOUR situation. With that said…

The customer’s architecture includes submitting the messages over a 2-way SSL channel and they want to use SAML 1.1 assertions with the Bearer confirmation method. Most people are probably more familiar with the Sender Vouches method in which the entity sending the SAML assertion (i.e. the SOAP client) is trusted by the receiving party – which means that every client needs a private key and the receiver needs to have the associated Certificate (or the issuer’s Certificate).
In Bearer the sender of the message isn’t necessarily the party that actually created the SAML Assertion; if they were then you could just use Sender Vouches and be done. In Bearer you’re saying that the communication channel authenticates the caller; this also means that the party sending the message could get a SAML assertion from somewhere else and then just includes it in the SOAP message. There are a bunch of dangers in this sort of architecture, but you can mitigate most of them through appropriate architectural choices. What those dangers are and how you mitigate them is a subject for a separate post. There’s a third confirmation method called Holder of Key which is, again, a great subject for another post.

In any case when you use the Bearer Confirmation Method you might want the assertion to be signed, especially if it comes from somewhere other than the client. So who has the private key? And what certificates do you need to put in the keystore?

When you install WebLogic the installer automatically creates a couple of keystores for you. Gerard Davison discusses this a bit in a blog post in the context of setting up SSL. We can use the same keystores for testing SOAP.First here’s the table (shamelessly copied) from Gerard’s post:

Property Value
Trust store location wlserver_10.3/ server/lib/DemoTrust.jks
Trust store password DemoTrustKeyStorePassPhrase
Key store location wlserver_10.3/ server/lib/DemoIdentity.jks
Key store password DemoIdentityKeyStorePassPhrase
Private key password DemoIdentityPassPhrase

As you can see there are two JKS files – DemoTrust.jks and DemoIdentity.jks. Take a look at the contents of them by using keytool:

keytool -list -keystore DemoIdentity.jks -storepass DemoIdentityKeyStorePassPhrase
keytool -list -keystore DemoTrust.jks -storepass DemoTrustKeyStorePassPhrase

You’ll find that DemoIdentity.jks contains a Private Key and DemoTrust.jks contains the associated Certificate (and a few others).
I’m a huge fan of automated unit test tools. I’ll often invest literally tens of hours writing test drivers that will be thrown away when the project is done just so I can be sure that I haven’t missed anything. More importantly I want to be 100% sure that we’ve got test coverage for all of the positive and negative cases we’ve thought of in the design phase.

So for my little SOAP tester in my test environment I can use the DemoIdentity.jks file to sign the SAML Assertion and as long as OSB is configured to use DemoTrust.jks it should accept my SAML Assertion.

In the real world you definitely won’t be using the DemoTrust keystore. Instead you’ll create another Key Store to be used on the OSB server and you’ll probably put the Certificate of the SAML assertion generator in there (if it’s a self-signed cert) or the Cert chain needed to verify the signature.

Hope this helps!

Using the x.509 Attribute Sharing profile responsibly

$
0
0

Introduction

This article is about development of Custom plug-ins for OVD for a very specific use case.

Main Article

I’m back, rested and I’ve had some time to think about the crazy (clever?) OVD adapter I wrote for last week’s PoC. You know, the one that lets you do a search for certdn= the user’s certificate DN and it makes a SOAP call over to OIF to get the user info?

I’ve talked to a few people internally about how this thing works and at first everyone has had the same reaction – that’s kinda cool. Then we get to talking about the fine print warning:

Before you go further a warning: If you’re going to try this at home make sure you test if for scalability. It’s not entirely clear that this will scale up to thousands of concurrent users. OAM and OVD will easily support that, as will OIF (as both the SP and IdP). But the entire architecture relies on SOAP calls over the Internet and those are notoriously latency heavy. As a result the initial access by a user will be relatively slow and that could cause any number of issues. If a large percentage of your users visit for only a short time those problems will be worse.

Not everyone I’ve talked to is as concerned. At least not before seeing it run. Perhaps I’m a little more conservative about performance in large scale deployments. Or maybe I’ve seen one too many super clever solutions fall flat on their faces when faced with the real world. But in any case I cooked this crazy idea up and am still not convinced it’s a good one.

Read on for why I’m a little gun shy.

Imagine that you have a web server that’s seeing one of these special user logins per second (I’m using stupid numbers as examples here, bear with me). Everything works just fine as long as the back end (the OAM server) can handle that authentication – again just one special authentication per second. Each of those funky authentication requests coming in requires OAM to do a search for certdn= and the user’s certificate DN. If the user isn’t in cache already my custom OVD adapter has to make a SOAP call over to the SAML Service Provider (OIF in this case) which in turn makes a SOAP call over the Internet to the IdP. The local call is probably pretty safe and fast – it’s on your own infrastructure after all; the other call is riskier since it goes out over the Internet (via SOAP over an HTTPS connection). As long as those calls over the Internet can keep up things will go fine. But what happens if the IdP has some problem or can’t keep up?

Let’s say 9:00 AM rolls around and a bunch of users read the email someone sent them about our site. Each of those users immediately clicks on the link, pops their smart cards into their machine and a whole bunch of “new” users hit OAM. OAM makes the LDAP calls over to OVD as normal. The LDAP calls for these users the plug-in has never seen before are going to take time so the from OAM to OVD “hangs” waiting for a response while our plug-in is waiting for the SOAP call to complete.

And that’s the dangerous bit.

If the rate of new users coming in gets too large the whole site starts to strain under the load. It’s not any one component’s fault – the SOAP calls just take time.

I’m not sure I’ve explained it well enough, so if it’s not clear someone let me know in the comments.

So what do I think is a better solution?

I’m so glad you asked!

I think a better solution would be to take out all of the XASP code from OVD and instead use a conventional database store. The first time OAM searches for the user with the same search I discussed above (certdn equal to the user’s certificate DN) OAM won’t find the user. We take advantage of this and configure OAM to redirect the user to another really simple application that pulls the certificate DN out of the HTTP header, makes the XASP call and then inserts the user into the user cache database, and then redirects the user back to their original URL. The revised architecture looks something like this:

Screen+shot+2011-01-24+at+3.01.08+PM

You’d probably deploy both applications on the same web server so that the user doesn’t get two certificate prompts, but that’s easy enough. In fact the application might even be deployed in the same WebLogic server as the rest of your applications – it’s all behind a Web Server and WebGate anyway.

Despite having more boxes in the diagram this architecture is actually simpler. You can use an out of the box OVD adapter and you only need to write a small chunk of a conventional web application.

I’m curious about what others think of my two alternative solutions so please comment below!


5 Minutes or Less: On SAML Audiences, Entities and Issuers

$
0
0

I’ve recently helped a customer who wanted to integrate a home-built SAML Identity Provider with a Weblogic Service Provider. After exchanging metadata and going through all the necessary configuration on both sides, they came across this error in Weblogic server logs:

####<Aug 15, 2011 4:55:19 PM EDT> <Debug> 

<SecurityAtn> <server.customer.com> <server1> <[ACTIVE]
ExecuteThread: '0' for queue: 'weblogic.kernel.Default (self-tuning)'>
<<WLS Kernel>> <>
<47200eb89d62d77c:56693a0d:131cefb4c9d:-8000-00000000000001b0>
<1313441719095> <BEA-000000>
<com.bea.common.security.internal.service.IdentityAssertionTokenServiceImpl.assertIdentity
- IdentityAssertionException>
####<Aug 15, 2011 4:55:19 PM EDT>
<Debug> <SecuritySAML2Service> <server.customer.com>
<bi_server1> <[ACTIVE] ExecuteThread: '0' for queue:
'weblogic.kernel.Default (self-tuning)'> <<WLS Kernel>> <>
<47200eb89d62d77c:56693a0d:131cefb4c9d:-8000-00000000000001b0>
<1313441719097> <BEA-000000> <exception
info
javax.security.auth.login.LoginException: [Security:090377]Identity Assertion Failed, weblogic.security.spi.IdentityAssertionException:
[Security:090377]Identity Assertion Failed,
weblogic.security.spi.IdentityAssertionException:
[Security:096539]AudienceRestriction condition not satisfied (no matching
audience).
at
com.bea.common.security.internal.service.IdentityAssertionServiceImpl.assertIdentity(IdentityAssertionServiceImpl.java:89)
We can clearly see that Weblogic’s Assertion Consumer Service (ACS) is trying to validate the SAML assertion. As part of that, it is verifying the AudienceRestriction condition.

According to the SAML specification, “the <AudienceRestriction> element specifies that the assertion is addressed to one or more specific audiences identified by <Audience> elements… The Audience URI MAY identify a document that describes the terms and conditions of audience membership. It MAY contain the unique identifier URI from a SAML name identifier that describes a system entity.” It also says that “the audience restriction condition evaluates to Valid if and only if the SAML relying party is a member of one or more of the audiences specified.

If you can manage to look at the actual SAML assertion being generated by the Identity Provider, you should be able to what the Identity Provider is adding as <Audience> elements. In this customer case, it was:

<saml2:Conditions NotBefore="2011-08-15T20:54:11.000Z" NotOnOrAfter="2011-08-15T20:58:11.560Z">

<saml2:AudienceRestriction>
<saml2:Audience>http://server.customer.com:9704/saml2/sp/acs/post</saml2:Audience>
</saml2:AudienceRestriction>
</saml2:Conditions>


The ACS was actually complaining about the <Audience> value, which is wrong here.

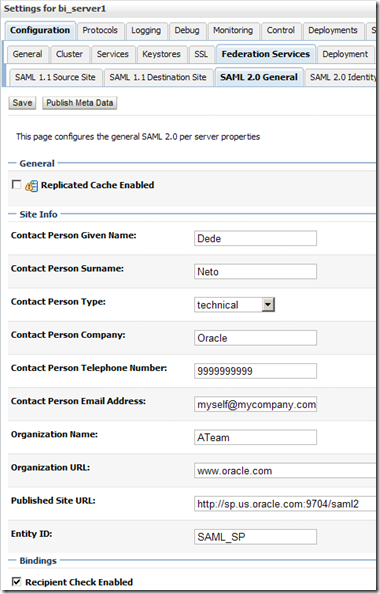
It turns out that the Audience value must match the service provider ID. In the case of a Weblogic Service Provider, such value is the Entity ID, specified in Weblogic Console as part of the Service Provider metadata definition in the “SAML 2.0 General” tab, as in the following screen:

image

The Entity ID parameter uniquely identifies a partner across federation interactions.

The customer then managed to make their home-built Identity Provider adding the value of http://sp.customer.com to the <Audience> element and things got all on track.

And have in mind that the URL format is only a recommendation. It can theoretically be any string less than 1024 characters long.

Another thing to be aware of is that the Assertion Consumer Service will also try to verify the <Issuer> element value in the incoming token against the “Issuer URI” in the Service Provider partner definition.

image

 And the “Issuer URI” value comes from the Identity Provider metadata definition that is imported into Weblogic’s Service Provider.

Five Minutes or less: OpenID

$
0
0

Introduction

Most of the technical people I work with know what SAML is and how it works and how the federation protocols for SAML work (SP initiated, IdP initiated, Browser Artifact, Browser POST). OpenID is much less well known.

Main Article

So here’s what you need to know about OpenID in five minutes or less.

In OpenID there are three parties:

  • The user and their browser.
  • The Relying Party (sometimes abbreviated to RP) is the web site that’s asking the user to authenticate. In SAML this is the Service Provider.
  • The OpenID Provider (sometimes abbreviated OP) is the web site that’s going to vouch for the user. In SAML this is the Identity Provider

Many people use the SAML and OpenID terms interchangeably when talking about the OpenID parties but I’ll try to remember to stick with the right ones for this post.

OpenID works a whole lot like SAML’s SP Initiated Browser POST authentication except for these differences:

  1. All user interactions are via HTTP GET
  2. The RP and OP communicate directly with each other via HTTP

Here’s a simplified view of the flow:

openid_flow


I’ve broken the flow into three stages:

  1. Choose OP
  2. Login @OP
  3. AuthN

Note: these are my own divisions and names; the OpenID standard doesn’t break the flow up and doesn’t have names for what I call stages.

Stage 1: Choose OP
The first step in the OpenID flow is the user telling the Relying Party which OpenID Provider they would like to use, often though the NASCAR style row of buttons. Under the covers each of those buttons corresponds to a URL and when you click the button the HTML form is actually submitting the URL to the Relying Party’s web site. In some cases the site will allow you to enter a URL of your choosing.

When you send the URL to the site the Relying Party checks to see if it “likes” the OpenID Provider (usually by checking against a list of providers). If the URL looks OK the RP makes an special HTTP request, called an XRDS request, to the OP. The OP returns back a bunch of data describing the OP including the features and functionality that the OP offers.

A couple of other things happen here, but in the interest of time I’m going to skip over them.

If everything looks OK the RP redirects the user to the OP with an Authentication Request (via an HTTP GET with the data in the query string).

Stage 2: Login @ OP
When the user sends their Authentication Request to the OP the OP makes the user login. If the user has already logged in to the OP then that step might be skipped.

After the user has authenticated to the OP the OP generates an authentication response for the RP and redirects the user back to the RP.

Stage 3: AuthN
Finally… the user presents that authentication response to the RP (via an HTTP GET). The RP checks it out and if it’s “good” then the user is considered logged in.

Finally the RP returns the content, application or whatever it is that they were trying to do at the RP in the first place.

Virtual Users in OIF, Weblogic and OWSM

$
0
0

One of the main strengths of SAML is the ability to communicate identity information across security domains that do not necessarily share the same user base. In other words, the authenticated user in one security domain does not necessarily exist in the target security domain providing the service.

Such concept is supported in all major Oracle products that consume SAML tokens: OIF, Weblogic Server and OWSM. The sole purpose of this post is to show how to configure it in these products. Setting up SAML services as a whole involves more than what’s showed here and I recommend the official product documentation for detailed steps.

I hope this can be helpful to someone out there.

OIF (Oracle Identity Federation)

OIF enables federated single sign on for users behind a web browser.

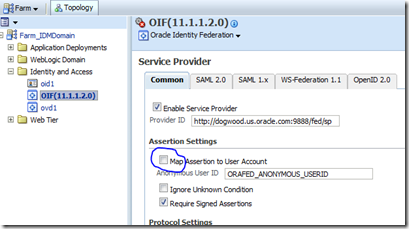
It calls the aforementioned concept “Transient Federation” and enables it via a checkbox (that should be unchecked) in Enterprise Manager OIF’s Console. Notice it also supports the concept of a "Mapped Federation", where the incoming identity is mapped to some generic user in the local identity store. But here I am talking about the case where there's no mapping. The user in the SAML assertion is simply trusted.

In order to enable a Transient Federation in OIF, simply make sure “Map Assertion to User Account” checkbox is unchecked in the Service Provider Common tab.

oif

Weblogic Server

Weblogic server provides SAML services that can be leveraged by Web SSO as well web services.
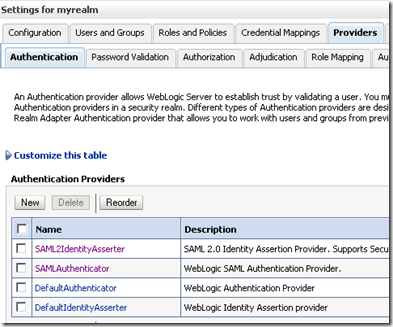
Weblogic calls the concept Virtual Users and implements it in its SAML2IdentityAsserter along with the SAMLAuthenticator.

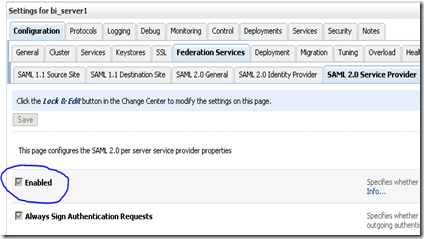
First, you need to enable your server as a SAML Service Provider. Notice this is done at the server level. Go to Environment –> servers –> <Pick server from list> to get into the screen below:

SAMLServiceProvider

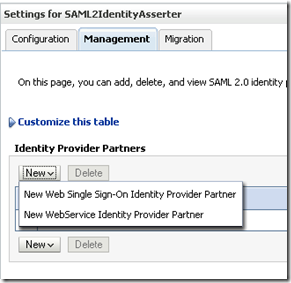
Then add a SAML2IdentityAsserter to the authentication providers list and add an Identity Provider (who does not need to be another Weblogic server) Partner to SAML2IdentityAsserter. Notice that you can add either a Web SSO partner provider or a Web service partner provider. In the case of Web SSO, Weblogic Console will ask you for the partner metadata file.

wls_IdpPartner

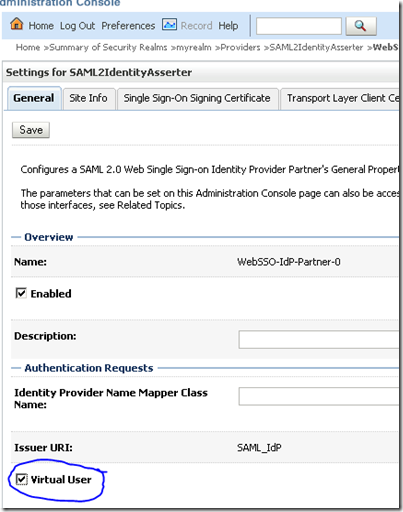
In SAML2IdentityAsserter’s Management tab, click the Identity Provider partner link just created and check the “Virtual User” check box:

wls

You also need to add a SAMLAuthenticator provider after the SAML2IdentityAsserter and set its control flag to SUFFICIENT. Also make sure to set the control flag of subsequent authentication providers to SUFFICIENT.

wls_providers

End result is that the SAMLAuthenticator will instantiate a Java Subject populated with a user principal (weblogic.security.principal.WLSUserImpl) from the SAML Subject asserted by SAML2IdentityProvider.

OWSM (Oracle Web Services Manager)

OWSM protects SOAP web services via agents connected to web services providers as well as web services clients. The agent behavior is determined by the policies that get attached to the provider and the client. A client policy typically adds a token to the outgoing SOAP message while the server policy processes it, usually by authenticating and/or authorizing the user (in the case of a security policy).

First of all, a SAML-based security policy needs to be attached to the web service provider. The policy will at some point try to authenticate the subject in the incoming SAML assertion.

OWSM delegates authentication to OPSS (Oracle Platform Security Services). When asserting the SAML Subject to the container, OWSM leverages the SAML Login Module, defined in jps-config.xml and configured via EM (Enterprise Manager).

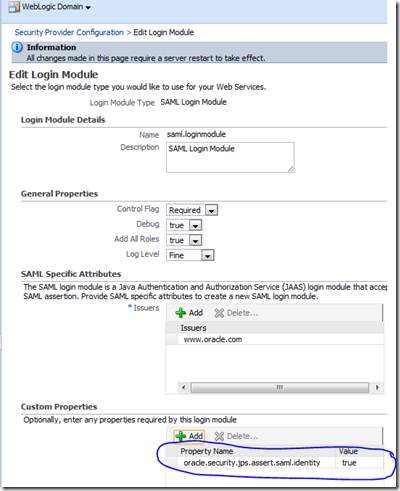
In other to enable virtual users in this scenario, set the property oracle.security.jps.assert.saml.identity to true for the SAML (or SAML2) Login Module. In EM, click the Weblogic Domain drop-down menu, pick Security –> Security Provider Configuration, click the login module row and then the Edit button. Scroll down to the bottom of the page and the add the property mentioned above to the list of Custom Properties.

opss_samlloginmodule

In order to propagate the change, restart the Admin server as well as the managed server running the web service.

Once this is done, whether or nor the SAML Subject exists in the identity store used by OPSS is irrelevant. It is going to be asserted and a Java Subject containing a user principal is going to be instantiated in the container.

5 Minutes or Less: WLS SAML2 SSO and your cookies

$
0
0

This is somewhat related to what Brian describes in WLS Session Cookie Overriding in an OAM/SSO Enabled Environment. Here, I want to quickly point one potential issue if you plan to implement Web SSO using Weblogic server as a SAML2.0 Service Provider (SP).

When configuring a Weblogic server instance for SAML2.0 services, you have to fill in a property called “Published Site URL”.

ServiceProviderGeneralInfo

When this instance is an SP, this property tell the partner IdP (Identity Provider) where to post SAML Responses to. In the case of SAML2.0, that URL must be http://<server>:<port>/saml2, where <server> and <port> must refer to how the IdP recognizes the SP. In other words, if you have something like a load balancer in front of Weblogic server (which is the case if you’re running a cluster), <server> and <port> would be the load balancer’s. “saml2” is the web context of Weblogic’s internal SAML2.0 servlet, whose fully qualified name is com.bea.security.saml2.servlet.SAML2Servlet.

Very well, this servlet, when called as a Service Provider, has the ability to consume a SAML assertion created by the partner IdP and instantiate an HTTP session for the browser session in the server. And it will tie it to the browser session by issuing a cookie named JSESSIONID whose cookie-path is set to “/”.  So what?

It turns out that many applications specify their own cookie-path to avoid the problem of JSESSIONID clashing, where last accessed applications by the browser override the JSESSIONID cookie value during the same browser session, thus leaving orphaned HTTP sessions in the server.

It also turns out that other applications use a different cookie name to avoid the same problem.

In both cases, the JSESSIONID cookie issued by saml2 servlet won’t be accepted by the application. You may be prompted for authentication again (this time by the application), get an HTTP 401-Unauthorized error or get into an infinite loop of redirects between SP and IdP.

The most obvious solutions to these problems is removing the cookie-path constraint from the application (in which case it defaults to “/”) and having the application using the JSESSIONID name. You may need to get the blessings of your application provider for supportability purposes before proceeding to the changes.

That said, get to know your applications’ cookies (cookie-name and cookie-path) before integrating them into WLS SAML2 SSO.

Integrating OBIEE 11g into Weblogic’s SAML SSO

$
0
0

SAML is a way to convey identity information across systems. It is an industry-accepted standard and especially interesting when you need to propagate user information between different security domains, because it can overcome the HTTP cookie limitations in cross-domain scenarios (although there are ways to solve that with OAM today) and implement the concept of  transient federation (also known as virtual users), where the user base is not shared between partners.

I've recently came across a scenario requiring OBIEE 11g integration into SAML 2.0 SSO. The requirement was that OBIEE 11g should be able to drive its authorization decisions based on the SAML Subject as well as SAML Attribute Statements from the SAML Assertion generated by a home-built Identity Provider (IdP). This post examine what can be done (and how) in this scenario.

The exact products versions used in this demo are as follows:

  • Platform: Windows XP Server
  • Oracle Weblogic Server 10.3.5
  • Oracle Business Intelligence Enterprise Edition 11.1.1.5

OBIEE 11g (since 11.1.1.3) delegates authentication, authorization and credential management to OPSS, which means users, groups, policies and credentials are all externalized. One typical OPSS deployment mode is using an LDAP server as the general security store for all artifacts. Remember though, at the time of this writing, OID is the only one supported LDAP server for policies.

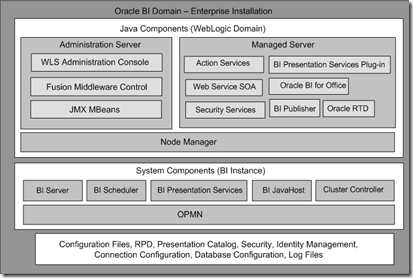
A quick look at OBIEE 11g overall architecture is necessary to understand what comes up right next. I wouldn’t dare going into the details of OBIEE architecture on this post, so I recommend you take a look at the product official documentation. A good starting point is here.

For our purposes here, the important aspect to notice is that OBIEE has some components that run on Weblogic and some components that do NOT run on Weblogic. The core BI services are provided by the BI Server and BI Presentation Services. These are C-based standalone applications indeed.
Within Weblogic, the BI Presentation Services Plugin interfaces with the standalone BI Presentation Services system component, providing the web experience for end users.

The picture below (borrowed from the product documentation) describes the OBIEE architecture.

OBIEE_Architecture

Of particular interest for our topic is the Security Services component.

In SSO mode, the BI Server components gets the authenticated userid from Weblogic and calls back the Security Services to construct an object (containing user principals, like userid and groups) that is returned back to BI server, who in turn uses it to drive authorization decisions on its internal objects. This alone allows OBIEE to consume a SAML Subject for the purpose of authorization decisions. So far, so good.

But what about using SAML Attribute Statements to drive authorization decisions within BI server? That would require SAML Attribute Statements to be persisted into OBIEE identity store once the SAML authentication request hits the server, so that Security Services could construct the necessary object when called back by BI Server. But SAML Attribute Statements are not persisted in the identity store.

Such characteristic essentially moots SAML Attribute Statements in this type of scenario. And that makes the usage of virtual users along with attribute processing irrelevant in a SAML Identity Asserter which also dismisses the need of a SAML Authenticator.

I am not saying this is something impossible to be done. It would require some custom work.

Long story short, in 11.1.1.5, out-of-the-box, OBIEE can consume the Subject out of a SAML Assertion, and that userid has to exist in the configured identity store for OBIEE.


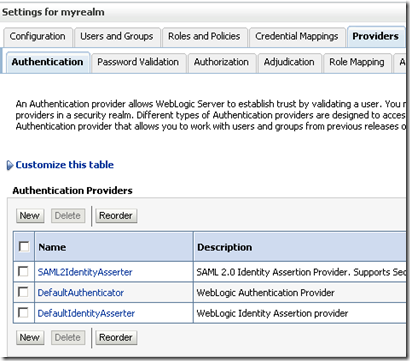
When a SAML assertion is received by the Weblogic server hosting the target application, Weblogic's SAML Identity Asserter parses the assertion and interacts with the ACS (Assertion Consumer Service) to validate it. If everything is ok, the identified user in the SAML assertion is passed down to the next authentication provider, who effectively authenticates the user and instantiates a Java Subject in the container. Make sure one of your authentication providers following SAML2IdentityAsserter is able to authenticate the user.

AuthenticationProviders

In my demo, the SAML assertion is produced by another Weblogic server working as the IdP (Identity Provider), via a SAML 2 Credential Mapper. A credential mapper essentially maps an existing java Subject to some credential.

From a configuration perspective, there are three main things do be done on OBIEE Weblogic server side: i) configuration of a SAML 2.0 Identity Asserter along with enabling SAML 2.0 Service Provider, ii) change of Analytics' web.xml and weblogic.xml deployment descriptors and subsequent redeployment and iii) configuration of OBIEE for SSO in Enterprise Manager. For completion purposes, I also show how to configure a Weblogic server to be the Identity Provider.

If you already know how to configure Weblogic Federation Services and what to expect when OBIEE managed servers are in a cluster, you can safely skip the next section as well as Configuring the Identity Provider section. There's really nothing special particular do OBIEE in them.

If you’re configuring both the SP and IdP in a single host (for testing purposes), make sure to refer to each of them using different names. For example, in my setup, the SP is sp.us.oracle.com and the idp is idp.us.oracle.com.

1. Configuring the Service Provider

Reference documentation is here. Here's a tour and some notes over my configuration:

1) Add a SAML 2 Identity Asserter to the set of authentication providers and restart the Admin server. This is necessary for enabling configuring the server as a Service Provider (SAML 2.0 Service Provider tab in Federation Services)

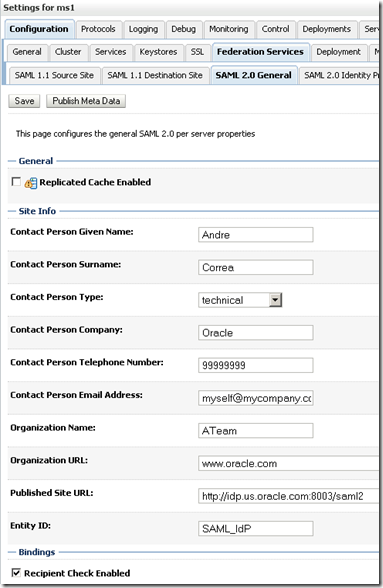
2) Configure Weblogic Federation Services by filling in SAML 2.0 General tab for the Service Provider server. In the case of OBIEE, this is bi_server1. The information entered here is given to partners through a metadata file and is used as a means to establish trust across servers.

ServiceProviderGeneralInfo


Couple of important notes here:

  • The Entity ID field value determines the name of this SAML server to its partners. If you have a cluster, make sure every member of the cluster is assigned the same value. An IdP will use this value to identify the Audience to which the SAML message is addressed. As any server in the cluster should be able to process the message. By the way, when configuring a cluster of SAML servers, make sure their configuration is exactly the same. Notice you can use Weblogic's recording capabilities to save your actions into a script and replay that in the other servers using wlst.
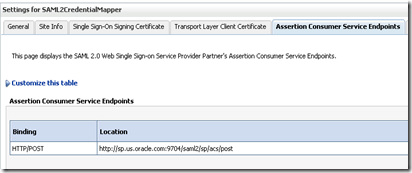
  • The Published Site URL field value is the base URL for federation services on the server. For SAML2, make sure the webcontext path is saml2. This is going to be used in the metadata file as the prefix to build the ACS (Assertion Consumer Service) endpoint necessary for allowing an Identity Provider to properly communicate with this Service Provider. For example, an Identity Provider would be provided the following ACS endpoint is the above Published Site URL is specified:

IdP_ACS_Configuration

  • When OBIEE managed servers are in a cluster, there’s typically an HTTP load balancer in front of the servers. In such case, make sure the Published Site URL refers to the name and port of the load balancer, because they are the ones the IdP needs to know. And also, make sure the load balancer is configured for session affinity. Reason being the SP ACS is a stateless application, that upon creating a session, redirects the browser to the requested URL (/analytics). If that redirection hits a different server in the cluster, there’ll be no session there and the user will be sent back to the IdP who will ask for credentials again.
  • Also, when Weblogic SAML services are in a cluster, you must use RDBMS as Weblogic server security store to avoid synchronization issues of SAML data across servers. Such requirement is for SAML data only, it has nothing to do with application session management, which is configured on a per application basis. And RDBMS should be set as the security store from the ground up, when the domain is first created. Trying to change the security store from embedded LDAP to RDBMS is not recommended.

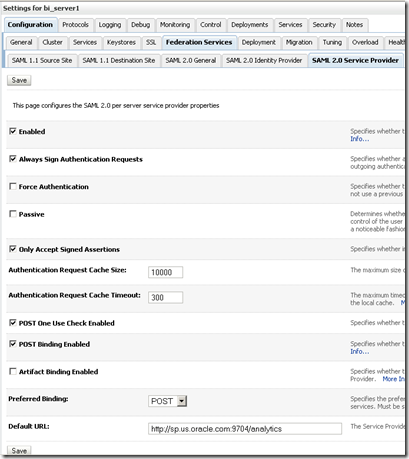
3) Enable BI managed server as a  SAML2.0 Service Provider.

EnablingServiceProvider


Important Note:

  • Default URL is invoked whenever a requester hit this Service Provider without an specific target service URL.

4) Export the SP configuration to a metadata file. Notice that any subsequent changes to your SP configuration will require a new export. Click Publish Metadata button in SAML 2.0 General tab and save it to a file. Examine the file contents. Notice the presence of an X509 certificate, to be used by the partner to encrypt data targeted to this Service Provider. Yes, the certificate is obtained from the Identity keystore configured for the server.

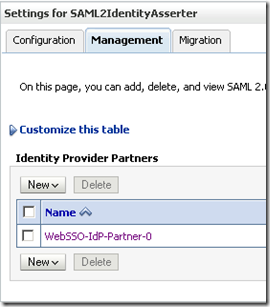
5) Get the IdP metadata file and import it as a Web SSO partner in the Management tab of SAML 2
Identity Asserter configuration. You should end up with something like this:

IdPmetadataImport

Click the partner name and edit the configuration:

IdPmetadataConfiguration


Important Notes:

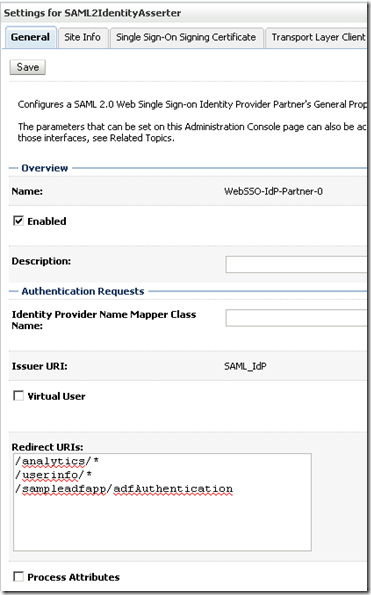
  • Notice that Virtual User and Process Attributes are not checked. They only make sense if you can use a SAML Authenticator.
  • Redirect URIs are the set of URIs that when called trigger the SAML SSO mechanism. It is a must that they are also secured by the container, otherwise Weblogic won't trigger the authentication process. Specifically, you must make sure that those mentioned applications use CLIENT-CERT as the auth-method in theirs web.xml.

2. Changing Analytics' web.xml for security constraint and adding weblogic.xml for role assignments

As previously mentioned, Weblogic server must be able to trigger container authentication upon an unauthenticated request for a URI specified in the set of Redirect URIs defined in the Service Provider partner configuration. Analytics application already ships with CLIENT-CERT auth-method, which is what we want. However, it does not define any security constraints about which users should be allowed access to the application.

OOTB, OBIEE defines three groups: BIAdministrators, BIAuthors and BIConsumers, who are respectively assigned to three application roles in OPSS policy store: BiAdministrator, BIAuthor and BIConsumer. Each of these roles are obviously assigned distinct permissions across the system. Look at ${BI_DOMAIN}/config/fmwconfig/system-jazn-data.xml file in a default OBIEE installation for such definitions.

We need to grant those 3 groups access to the Analytics application in the standard JavaEE way, i.e., by adding a security-constraint to any resource under the analytics web context in web.xml. Additionally, we must map the role name in the security-constraint to those 3 groups in weblogic.xml.

You'll need to "unjar" the analytics application, make the changes, "rejar" it and redeploy the application. You find the original ear file at ${BI_HOME}/bifoundation/jee/analytics.ear

In web.xml (add <security-constraints> and <security-role> elements):

<security-constraint>
  <web-resource-collection>

    <web-resource-name>BI Analytics</web-resource-name>
    <url-pattern>/*</url-pattern>
  </web-resource-collection>
  <auth-constraint>
    <role-name>allowedGroups</role-name>
  </auth-constraint>
</security-constraint>
<login-config>
  <auth-method>CLIENT-CERT</auth-method>
</login-config>
<security-role>
  <role-name>allowedGroups</role-name>
</security-role>

weblogic.xml (it has to be created in the same folder as web.xml):

<?xml version = '1.0' encoding = 'windows-1252'?>
<weblogic-web-app xmlns:xsi="http://www.w3.org/2001/XMLSchema-instance"
         xsi:schemaLocation="http://www.bea.com/ns/weblogic/weblogic-web-app http://www.bea.com/ns/weblogic/weblogic-web-app/1.0/weblogic-web-app.xsd"
         xmlns="http://www.bea.com/ns/weblogic/weblogic-web-app">
  <context-root>analytics</context-root>
  <security-role-assignment>
    <role-name>allowedGroups</role-name>
    <principal-name>BIAdministrators</principal-name>
    <principal-name>BIAuthors</principal-name>
    <principal-name>BIConsumers</principal-name>
  </security-role-assignment>
</weblogic-web-app>

Notice the <principal-name>s. They refer to the groups that OBIEE expect to find in the configured identity store. They are groups, not application roles. If you decide to change those names, make sure they match the application role assignments in the policy store.

If you want any existing user accessing the analytics application,  you can map allowedGroups role-name (defined in web.xml) to the users group (instead of BIAdministrators, BIAuthors and BIConsumers) in weblogic.xml. In Weblogic, any authenticated user is automatically assigned to the users group.

3. Configuring OBIEE for SSO in Enterprise Manager

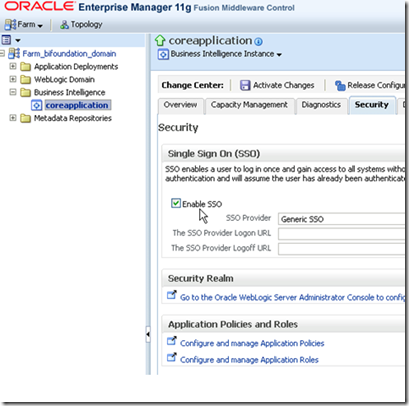
There’s still one more configuration for SSO in OBIEE. In Enterprise Manager, enable SSO and set the provider to “Generic SSO” for OBIEE’s coreapplication, as shown:

SSOEnabling_EM

The screen is reachable via clicking the “coreapplication” link on the left and then selecting “Security” from the “Business Intelligence Instance” drop down menu on the right.

4. Configuring the Identity Provider

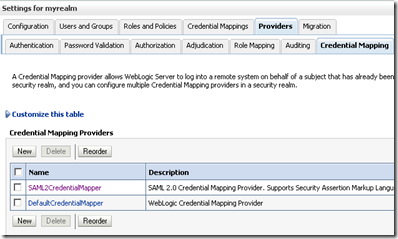
Configuration of the IdP is straightforward, very similar to SP’s. Here, we create a SAML2CredentialMapper, enable the server as an IdP and import the SP metadata to the credential mapper configuration.

1) Add a SAML2CredentialMapper to the list of Credential Providers and restart the Admin server.

IdPCredentialProviders

2) Fill in IdP’s General Info tab.

IdP_GeneralInfo

3) Enable the server as an IdP.

IdP_Enabling

4) Get the metadata file exported from the SP and import it as an IdP partner in the SAML2CredentialMapper configuration.

IdP_Partner

Hope this can be useful to someone out there. Lots to digest, I agree. :-)

Before I forget it: HowTo SAML 2.0 IdP-initiated flow in Weblogic

$
0
0

I’d better do it now, otherwise I will forget the details.

Quite some people think that all an IdP-initiated flow requires is the target application URL in the consumer side. This is actually nothing more than a SP-initiated flow. In this way, you’ll hit the Service Provider with no SAML Assertion, will be redirected back to the IdP for the SAML assertion and then sent back to the Service Provider.

An IdP-initiated flow actually first needs to get a hold of a SAML assertion for the authenticated user. The assertion is then submitted along with the request to the target application URL. If the Service Provider decides to accept the assertion, the user is granted access. There’s no need to come back to the IdP for the assertion.

This short post is about how to configure Weblogic SAML 2.0 for an IdP-initiated flow.

The URL to be given to the end user for an IdP initiated flow in Weblogic is:
http://<idp-server>:<port>/saml2/idp/sso/initiator?SPName=<SP-Partner-Name>&RequestURL=<target-application-url>

where:

  • saml2/idp/sso/initiator is the IdP service responsible for processing IdP-initiated request flows.
  • <SP-Partner-Name> is the Service Provider partner name you have configured for the Identity Provider.
  • <target-application-url> is the application you want to access in SSO mode on the Service Provider side.

Here’s an example of a real URL:

http://idp.us.oracle.com:7003/saml2/idp/sso/initiator?SPName=WebSSO-SP-Partner-0&RequestURLhttp://sp.us.oracle.com:9704/analytics

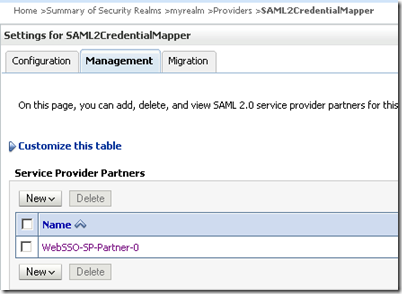
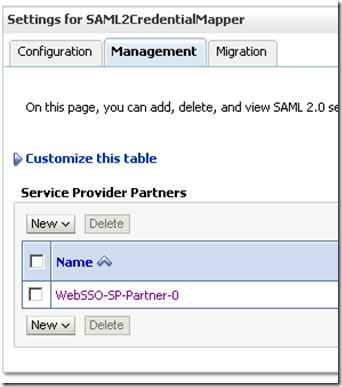
The SPName parameter value actually refers to a partner you’ve configured in Weblogic for your Identity Provider. A Weblogic Identity Provider for SAML 2 requires a SAML2CredentialMapper. And the partner we’re talking about is configured (usually given as a metadata file) in SAML2CredentialMapper’s Management tab, as shown:

SP-Partner

Notice the Name “WebSSO-SP-Partner-0”. It’s the one you need to use as the SPName value in the URL.

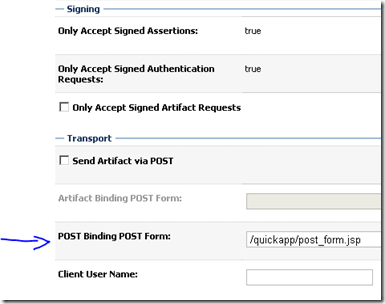
Ok, once given the right params, saml2/idp/sso/initiator service will do some magic for us. But we still need to give it a hand. The SP Partner configuration has a parameter called “POST Binding POST Form”. It is the URL containing an HTML form that will post the SAML Response to the SAML Assertion Consumer Service on the Service Provider Side.

post-form

Here’s the post_form.jsp code. Build it into an application and deploy it to the Weblogic server running the Identity Provider.

<!DOCTYPE HTML PUBLIC "-//W3C//DTD HTML 4.01 Transitional//EN"
"http://www.w3.org/TR/html4/loose.dtd">
<%@ page contentType="text/html;charset=windows-1252"%>
<html>
<head>
</head>
<%
String samlResponse = (String) request.getAttribute("com.bea.security.saml2.samlContent");
String relayState = (String) request.getAttribute("com.bea.security.saml2.relayState");
%>
<body onLoad="document.forms[0].submit();">
<FORM METHOD="POST" ACTION="http://sp.us.oracle.com:9704/saml2/sp/acs/post">
<INPUT TYPE="HIDDEN" NAME="RelayState" VALUE="<%=relayState%>"/>
<INPUT TYPE="HIDDEN" NAME="SAMLResponse" VALUE="<%=samlResponse%>">
</FORM>
</body>
</html>


3 things to notice:

  1. the form action: refers to the Service Provider Assertion Consumer Service for POST binding.
  2. SAMLResponse: the SAML Response generated by the IdP containing the SAML assertion.
  3. RelayState: a reference to state information maintained at the Service Provider.

That’s it.

Summarizing, the user logs in to the Identity Provider, click on a link like http://<idp-server>:<port>/saml2/idp/sso/initiator?SPName=<SP-Partner-Name>&RequestURL=<target-application-url>. The saml2/idp/sso/initiator service looks into <SP-Partner-Name> for the “POST Binding POST Form” and executes it. The form retrieves SAMLResponse and RelayState from Weblogic and auto-submits itself to saml2/sp/acs/post on the Service Provider. If the SAML assertion is accepted, the user’s browser is redirected to the <target-application-url>.

Enjoy your IdP-initiated flows.

Front-ending a SAML Service Provider with OHS

$
0
0

This is a follow-up to one of my previous posts titled Integrating OBIEE 11g into Weblogic’s SAML SSO, where I mention the following when configuring the Service Provider:

The Published Site URL field value is the base URL for federation services on the server. For SAML2, make sure the webcontext path is saml2. This is going to be used in the metadata file as the prefix to build the ACS (Assertion Consumer Service) endpoint necessary for allowing an Identity Provider to properly communicate with this Service Provider.

When OBIEE managed servers are in a cluster, there’s typically an HTTP load balancer in front of the servers. In such case, make sure the Published Site URL refers to the name and port of the load balancer, because they are the ones the IdP needs to know.

In this post, I assume there’s an OHS (Oracle HTTP Server) proxying requests to OBIEE analytics application, which is a fairly common production scenario. Let’s take a look at the necessary configuration changes to make it work.

There is only one change to be done in the SAML configuration. The Published Site URL value, in the SAML 2.0 General tab, must be changed to the OHS server http address. Assuming OHS is listening on ateam-us.us.oracle.com:7777:

PublishedSiteURL

Make sure to export the SAML Metadata and re-import it into your Identity Provider partner.

You should see the following as the new Assertion Consumer Service Endpoint:

ACSEndpoint

Now, in OHS, create a mod_wl_ohs routing rule to saml2 web context in the target Weblogic server. mod_wl_ohs is an OHS module that proxies requests to Weblogic server.

Include the following in mod_wl_ohs.conf. It is located in your OHS installation at <instance_home>/config/OHS/<component_name>, same location as httpd.conf.

<Location /saml2>
   SetHandler weblogic-handler 
   WebLogicHost sp.us.oracle.com
   WebLogicPort 9704
</Location>

<Location /analytics>
   SetHandler weblogic-handler
   WebLogicHost sp.us.oracle.com
   WebLogicPort 9704
</Location>

Restart OHS.

With such configuration in place, an unauthenticated request made to http://ateam-us.us.oracle.com:7777/analytics goes through OHS to Weblogic server, who redirects it to the Identity Provider site for authentication. Once finished, the Identity Provider redirects the browser to http://ateam-us.us.oracle.com:7777/saml2/sp/acs/post (per Assertion Consumer Service Endpoint above) along with a generated SAML assertion. The request is proxied by OHS to Weblogic server sp.us.oracle.com on port 9704 (per routing rule above). Once Weblogic server verifies the assertion, it redirects the browser to http://ateam-us.us.oracle.com:7777/analytics. The request goes through OHS again to the Weblogic server and the user is hopefully and finally given access to the application.


Part 2: Kerberos Authentication, RBAC and SAML identity propagation in OAG

$
0
0

This post is the second one of a series by Andre Correa and Paulo Pereira on OAG (Oracle API Gateway).

The first post is found at http://fusionsecurity.blogspot.com.br/2013/03/part1-kerberos-authentication-rbac-and.html. Check it out for use case background and the Kerberos authentication part.

As mentioned, one of the requirements in our exercise was to authorize the user against a ROLE X URI matrix, called “Authorization Matrix”. In this post we’re looking at the second policy (Call ‘Perform Authorization’) in the overall flow:

KerberosPolicy

Basically, “Perform Authorization” had to:

a. Obtain the authenticated user (authenticated by Kerberos);

b. Lookup the groups memberships in Active Directory;

c. For the requested URI, query a Database for the authorized roles for that URI in particular;

d. Check if any of the user groups (obtained from AD) is in the list returned by the DB query;

e. Authorize the user in case the check on the previous steps passes.

The OAG Policy we created looks like this:

image

Policy Filters Description


1. Process Service Principal Name (script)

This is a script that obtains the authenticated user. Since it is authenticated via Kerberos, the authenticated user id comes in the format of a SPN, <SERVICE>/<USER_ID>@<DOMAIN_NAME>. However, all subsequent steps rely only on the <USER_ID> part of it. Hence, we wrote a script to parse OAG’s attribute “authentication.subject.id”, where it automatically writes an authenticated user id to.

Here’s our script.

image

2. Retrieve User Groups from AD

Here we obtain the authenticated user’s AD groups. To do so, we used the “Retrieve Attributes from Directory Server” filter, who obtains current user’s memberOf attribute from Active Directory.

image

User data are put in OAG’s attribute “attribute.lookup.list”, a HashMap type of data structure. Within the HashMap, OAG keys the user groups values using the retrieved LDAP attribute name, memberOf.


3. Process Group DN

This is just another Scripting Language Filter to parse the result from the previous filter and obtain just the group name out of the retrieved DN (Distinguished Names).

image

4. Retrieve Authorized Groups for URI

Here we connect to the Database, and run a SQL query to obtain the authorized groups for the requested URI. We used the “Retrieve Attributes from Database” filter to achieve this.

image

The SQL query to retrieve the authorized roles uses OAG’s attribute “http.request.path” which is automatically created and populated  by OAG with the requested path.

The results of the query are stored in an attribute named after the column names of the SQL query statement, in this case, role_group. OAG adds the prefix “user.” to all attributes populated by the query, resulting in “user.role_group”, used in the next filter in the chain.

image

5. Set Authorization Result (script)

At this point we have two sets of data, the user’s groups from AD and the authorized roles for this particular URI. We just need to check if one of the user’s groups are in the authorized roles set.

OAG has a filter specifically created for Authorization, called Attributes. We couldn’t make it work for the type of comparison we had to make. We also tried the “Compare Attributes” filter, but it is unable to check whether at least one element of a collection is contained in another collection.

Therefore, we wrote another script to loop through one of the sets and do the checking, again another Scripting Language Filter. Note that if the check passes, we set a custom attribute, “user.is.authorized” to true. This attribute is inspected in the next step to decide if user is granted access to the resource.

Obs: We could have simply returned false here and ended the circuit in case the user is not authorized.
image

6. Compare Attribute

The last step is just a boolean evaluation, using the “Compare Attribute” filter. This is a simple filter where we have a few options to compare an attribute to a given value.

image

The result of our authorization policy is a boolean value. If true, we move onto the next step, which is adding a SAML token to the outgoing SOAP message, discussed in the next post of this series. See you there.

Part 3: Kerberos Authentication, RBAC and SAML Identity Propagation in OAG

$
0
0

Introduction

This post is the third one of a series by Andre Correa and Paulo Pereira on OAG (Oracle API Gateway).

In the first post we introduced the use case and talked about the Kerberos authentication part.

In the second post we talked about Role Based Access Control.

In this one we describe how to build a SAML token out of the authenticated user and sign it so it properly interoperates with an OWSM server-side policy applied to OSB proxy service. We also cover the necessary OWSM configuration in OSB and SOA. As a reminder, a typical request in our exercise flows through OTD -> OAG -> OTD -> OSB -> OTD -> SOA -> Stub server, and we’re required to keep the user identity all the way up to the Stub server.

Here we’re specifically talking about the third policy in our overall circuit:

overallPolicy

‘Add SAML token policy’ is as simple as:

SAMLPolicy

We first add the SAML token (using the Insert SAML Authentication Assertion filter), then we sign it (using the XML Signature Generation filter). Let’s look at each filter in detail.

Main Article

1. Insert SAML Authentication Assertion

We only present the screenshots where we have to change any of the default values or when we have some considerations to make.


1.1 Assertion Details

SAMLAuthnAssertionFilter_tab1

Notice the Issuer Name. It has to be a name registered for the OWSM server side policy in OSB. Otherwise, SAML validation will fail. More on this later on.

It’s important to realize that the assertion’s Subject Name Identifier is going to be whatever is in the authentication.subject.id attribute. If you’ve read the second post of this series, in the very first filter we process the Kerberos SPN (<SERVICE>/<USER_ID>@<DOMAIN_NAME>) and store just the <USER_ID> part in that attribute.

We have configured expiration time in 5 mins. And the SAML version is 1.1.

1.2 Subject Confirmation Method

SAMLAuthnAssertionFilter_tab3

No changes here. We’re using Sender Vouches, which means we’ll have to sign the message, so that the receiver will properly validate the sender’s identity. More on this later on.


2. XML Signature Generation

2.1 Signing Key

XMLSignatureGeneration_tab1

The message is signed with a private key aliased as orakey, available in a java key store created with the keytool command (more on this shortly). OWSM, on the OSB side, will verify the signature using the corresponding public key certificate. To complete the verification chain, the CA signing the public key certificate is also needed in OWSM key store.

Once you have the private key in the key store, this is how you get it into the filter.

First, click on the Signing Key button. You get the following.

SigningKey_1

By clicking the Keystore button, you get:

SigningKey_2

Click the button on the top right to pick the keystore in the fie system.

SigningKey_3

Once you pick the jks file, since it is likely password protected, OAG Policy studio asks you for the password. The same for the private key alias.

Right passwords entered, now just pick the private key.

SigningKey_4

2.2 Key Info

Have in mind that we’re building a WSS policy to interoperate with an OWSM policy that is going to be attached to the OSB proxy service. As such there’s an important “gotcha” when telling OAG how key information about the digital signature is transmitted. In this use case, we’ll attach wss11_saml_token_with_message_integrity_service_policy to OSB. As such, we must instruct OAG to deliver key information within a BinarySecurityToken element.

This is done in the KeyInfo tab under the SigningKey tab in XML Digital Signature filter:

KeyInfo

If you go with the pre-selected “Embed public key information”, you’ll hit a PolicyEnforcementException in OWSM, as the following.


Caused by: oracle.wsm.common.sdk.WSMException: GenericFault : generic error  
 at oracle.wsm.policyengine.impl.runtime.WSPolicyRuntimeExecutor.executeSimpleAssertion(WSPolicyRuntimeExecutor.java:677) 
 at oracle.wsm.policyengine.impl.runtime.WSPolicyRuntimeExecutor.executeAndAssertion(WSPolicyRuntimeExecutor.java:346) 
 at oracle.wsm.policyengine.impl.runtime.WSPolicyRuntimeExecutor.execute(WSPolicyRuntimeExecutor.java:294) 
 at oracle.wsm.policyengine.impl.PolicyExecutionEngine.execute(PolicyExecutionEngine.java:102) 
 at oracle.wsm.agent.WSMAgent.processCommon(WSMAgent.java:1001) 
 at oracle.wsm.agent.WSMAgent.processRequest(WSMAgent.java:470) 
 at oracle.fabric.common.BindingSecurityInterceptor.processRequest(BindingSecurityInterceptor.java:94) 
 ... 35 more 
Caused by: java.lang.ClassCastException: oracle.security.xmlsec.keys.X509Data cannot be 
cast to oracle.security.xmlsec.wss.WSSecurityTokenReference 
 at oracle.wsm.security.policy.scenario.policycompliance.impl.ProcessedIncomingSignatures.<init>(ProcessedIncomingSignatures.java:162) 
 at oracle.wsm.security.policy.scenario.processor.Wss10X509TokenProcessor.verify(Wss10X509TokenProcessor.java:286) 
 at oracle.wsm.security.policy.scenario.executor.Wss10SamlWithCertsScenarioExecutor.receiveRequest(Wss10SamlWithCertsScenarioExecutor.java:169) 
 at oracle.wsm.security.policy.scenario.executor.SecurityScenarioExecutor.execute(SecurityScenarioExecutor.java:562) 
 at oracle.wsm.policyengine.impl.runtime.AssertionExecutor.execute(AssertionExecutor.java:41) 
 at oracle.wsm.policyengine.impl.runtime.WSPolicyRuntimeExecutor.executeSimpleAssertion(WSPolicyRuntimeExecutor.java:669) 
 ... 41 more 
> 
<Mar 18, 2013 6:03:55 AM PDT> <Error> <oracle.webservices.service> 
<OWS-04115> <An error occurred for port: FabricProvider: oracle.fabric.common.PolicyEnforcementException: GenericFault : generic error.>


Look at the corresponding SOAP Envelope. Notice the dsig:X509Data element inside dsig:KeyInfo element.

<soap:Envelope xmlns:soap="http://schemas.xmlsoap.org/soap/envelope/">
    <soap:Header>
        <wsse:Security xmlns:wsse="http://docs.oasis-open.org/wss/2004/01/oasis-200401-wss-wssecurity-secext-1.0.xsd"> 
            <dsig:Signature xmlns:dsig="http://www.w3.org/2000/09/xmldsig#" Id="Id-0001363611835046-fffffffff235d266-2">
                <dsig:SignedInfo>
                    <dsig:CanonicalizationMethod Algorithm="http://www.w3.org/2001/10/xml-exc-c14n#"/>
                    <dsig:SignatureMethod Algorithm="http://www.w3.org/2000/09/xmldsig#rsa-sha1"/>
                    <dsig:Reference URI="#Id-e9007152514710bb4b400000-1">
                        <dsig:Transforms>
                            <dsig:Transform Algorithm="http://www.w3.org/2001/10/xml-exc-c14n#"/>
                        </dsig:Transforms>
                        <dsig:DigestMethod Algorithm="http://www.w3.org/2000/09/xmldsig#sha1"/>
                        <dsig:DigestValue>ndYlZEVrtLWKjC39gbpWvqFSbgg=</dsig:DigestValue>
                    </dsig:Reference>
                    <dsig:Reference URI="#Id-0001363611835046-fffffffff235d266-1">
                        <dsig:Transforms>
                            <dsig:Transform Algorithm="http://www.w3.org/2001/10/xml-exc-c14n#"/>
                        </dsig:Transforms>
                        <dsig:DigestMethod Algorithm="http://www.w3.org/2000/09/xmldsig#sha1"/>
                        <dsig:DigestValue>DgPyKqDj6L9unbTaNU4z8ef/hyk=</dsig:DigestValue>
                    </dsig:Reference>
                </dsig:SignedInfo>
                <dsig:SignatureValue>akll4kGbg6FoB2CbF3CKLFxdXJh4YkEY1VL+Oymvl33kLRrrTX+RmPEit6ykY4afKqcvu0f6M8etLt2d6maDL6P/+ZdhuNyxA487cOyX9VUtTePYPrSf1NAzGUf58Sr/gTLopthfV7PDE3GSQ8mfiZLHTIaLNNLRRAOs1f84tys=</dsig:SignatureValue>
                <dsig:KeyInfo Id="Id-0001363611835046-fffffffff235d266-3">
                    <dsig:X509Data>
                        <dsig:X509Certificate>MIICEzCCAXygAwIBAgIEUQvsVzANBgkqhkiG9w0BAQUFADBOMRMwEQYKCZImiZPyLGQBGRYDY29tMRYwFAYKCZImiZPyLGQBGRYGb3JhY2xlMRIwEAYKCZImiZPyLGQBGRYCdXMxCzAJBgNVBAMTAmRiMB4XDTEzMDIwMTE2MjQ1NVoXDTEzMDUwMjE2MjQ1NVowTjETMBEGCgmSJomT8ixkARkWA2NvbTEWMBQGCgmSJomT8ixkARkWBm9yYWNsZTESMBAGCgmSJomT8ixkARkWAnVzMQswCQYDVQQDEwJkYjCBnzANBgkqhkiG9w0BAQEFAAOBjQAwgYkCgYEAgPiuYOrhcZJ+ntyfg4F/dxEvqq846HsKDrcFHRiwLSqfuA1+MzTHmuoNALGczBhiMJ3bWpe7h22hNUzJbtWYTNY6K0saB3Pd/XXOOC+qgmoTTpq+4BJJpYdI9pVCk0R71dRWodRhUy5ujkjgMRSjibZW1rRaQodZci5RTTTiKJUCAwEAATANBgkqhkiG9w0BAQUFAAOBgQAH4mBglcpF6ylYQuchpOgLh3ND8TW84Wmae4bBdJY4Nw57y9uwwcGRo6H1sPy0qsdsVlWSH8LWOK8SzOayZ5Ixtq7FExh8PanBj6nMjFsUhGSR7N7piKsg5ueAL5cL4vUXV0OMseo+Z9tJ1CedD9tbfzvnDpDg8mwSidIlGpXAbA==</dsig:X509Certificate>
                    </dsig:X509Data>
                </dsig:KeyInfo>
            </dsig:Signature>
            <saml:Assertion xmlns:saml="urn:oasis:names:tc:SAML:1.0:assertion" AssertionID="Id-e9007152514710bb4b400000-1" IssueInstant="2013-03-18T13:03:55Z" Issuer="www.oracle.com" MajorVersion="1" MinorVersion="1">
                <saml:Conditions NotBefore="2013-03-18T13:03:54Z" NotOnOrAfter="2013-03-18T13:08:54Z"/>
                <saml:AuthenticationStatement AuthenticationMethod="urn:ietf:rfc:1510" AuthenticationInstant="2013-03-18T13:03:55Z">
                    <saml:Subject>
                        <saml:SubjectConfirmation>
                            <saml:ConfirmationMethod>urn:oasis:names:tc:SAML:1.0:cm:sender-vouches</saml:ConfirmationMethod>
                        </saml:SubjectConfirmation>
                    </saml:Subject>
                </saml:AuthenticationStatement>
            </saml:Assertion> 
        </wsse:Security> 
    </soap:Header>
    <soap:Body xmlns:wsu="http://docs.oasis-open.org/wss/2004/01/oasis-200401-wss-wssecurity-utility-1.0.xsd" wsu:Id="Id-0001363611835046-fffffffff235d266-1">
        <process xmlns="http://xmlns.oracle.com/SOAEcho/Echo/EchoProcess">
            <input>andre</input>
        </process>
    </soap:Body>
</soap:Envelope>


You overcome the exception by picking the Security Token Reference option. Here’s the corresponding SOAP Envelope. Notice we now have a wsse:SecurityTokenReference element within the dsig:KeyInfo element.


<soap:Envelope xmlns:soap="http://schemas.xmlsoap.org/soap/envelope/">
    <soap:Header>
        <wsse:Security xmlns:wsse="http://docs.oasis-open.org/wss/2004/01/oasis-200401-wss-wssecurity-secext-1.0.xsd"> 
            <wsse:BinarySecurityToken xmlns:wsu="http://docs.oasis-open.org/wss/2004/01/oasis-200401-wss-wssecurity-utility-1.0.xsd" 
                                            wsu:Id="Id-0001363612255582-000000007deffb30-1" ValueType="http://docs.oasis-open.org/wss/2004/01/oasis-200401-wss-x509-token-profile-1.0#X509v3" 
                                            EncodingType="http://docs.oasis-open.org/wss/2004/01/oasis-200401-wss-soap-message-security-1.0#Base64Binary">MIICEzCCAXygAwIBAgIEUQvsVzANBgkqhkiG9w0BAQUFADBOMRMwEQYKCZImiZPyLGQBGRYDY29tMRYwFAYKCZImiZPyLGQBGRYGb3JhY2xlMRIwEAYKCZImiZPyLGQBGRYCdXMxCzAJBgNVBAMTAmRiMB4XDTEzMDIwMTE2MjQ1NVoXDTEzMDUwMjE2MjQ1NVowTjETMBEGCgmSJomT8ixkARkWA2NvbTEWMBQGCgmSJomT8ixkARkWBm9yYWNsZTESMBAGCgmSJomT8ixkARkWAnVzMQswCQYDVQQDEwJkYjCBnzANBgkqhkiG9w0BAQEFAAOBjQAwgYkCgYEAgPiuYOrhcZJ+ntyfg4F/dxEvqq846HsKDrcFHRiwLSqfuA1+MzTHmuoNALGczBhiMJ3bWpe7h22hNUzJbtWYTNY6K0saB3Pd/XXOOC+qgmoTTpq+4BJJpYdI9pVCk0R71dRWodRhUy5ujkjgMRSjibZW1rRaQodZci5RTTTiKJUCAwEAATANBgkqhkiG9w0BAQUFAAOBgQAH4mBglcpF6ylYQuchpOgLh3ND8TW84Wmae4bBdJY4Nw57y9uwwcGRo6H1sPy0qsdsVlWSH8LWOK8SzOayZ5Ixtq7FExh8PanBj6nMjFsUhGSR7N7piKsg5ueAL5cL4vUXV0OMseo+Z9tJ1CedD9tbfzvnDpDg8mwSidIlGpXAbA==
			</wsse:BinarySecurityToken>
            <dsig:Signature xmlns:dsig="http://www.w3.org/2000/09/xmldsig#" Id="Id-0001363612255582-000000007deffb30-3">
                <dsig:SignedInfo>
                    <dsig:CanonicalizationMethod Algorithm="http://www.w3.org/2001/10/xml-exc-c14n#"/>
                    <dsig:SignatureMethod Algorithm="http://www.w3.org/2000/09/xmldsig#rsa-sha1"/>
                    <dsig:Reference URI="#Id-0001363612255582-000000007deffb30-2">
                        <dsig:Transforms>
                            <dsig:Transform Algorithm="http://www.w3.org/2001/10/xml-exc-c14n#"/>
                        </dsig:Transforms>
                        <dsig:DigestValue>d8+JhSgsm5F+GA3WT2d6L8Ae94o=</dsig:DigestValue>
                    </dsig:Reference>
                    <dsig:Reference URI="#Id-43116dec5147125f15400000-1">
                        <dsig:Transforms>
                            <dsig:Transform Algorithm="http://www.w3.org/2001/10/xml-exc-c14n#"/>
                        </dsig:Transforms>
                        <dsig:DigestMethod Algorithm="http://www.w3.org/2000/09/xmldsig#sha1"/>
                        <dsig:DigestValue>EruO9RPerewwBO8Af78QLqELjog=</dsig:DigestValue>
                    </dsig:Reference>
                </dsig:SignedInfo>
                <dsig:SignatureValue>Od62BfZGKe75Gih9GpQZjwk1r6Gw6Gkd1hwQVEYWPSuwiunwLxAfywYL/wqz0xv8kuSWxILQJlt0IYgUUMV4knr4cCWK71Gu+RZKRRXuoVQ+b3rAqy5+rC9QiRbI2OLpUwdoGVN05dVwGdmt9ZRvEL+Vu+MdOLICR1t27rFuSuE=</dsig:SignatureValue>
                <dsig:KeyInfo Id="Id-0001363612255582-000000007deffb30-4">
                    <wsse:SecurityTokenReference xmlns:wsu="http://docs.oasis-open.org/wss/2004/01/oasis-200401-wss-wssecurity-utility-1.0.xsd" wsu:Id="Id-0001363612255582-000000007deffb30-5">
                        <wsse:Reference URI="#Id-0001363612255582-000000007deffb30-1" ValueType="http://docs.oasis-open.org/wss/2004/01/oasis-200401-wss-x509-token-profile-1.0#X509v3"/>
                    </wsse:SecurityTokenReference>
                </dsig:KeyInfo>
            </dsig:Signature>
            <saml:Assertion xmlns:saml="urn:oasis:names:tc:SAML:1.0:assertion" AssertionID="Id-43116dec5147125f15400000-1" IssueInstant="2013-03-18T13:10:55Z" Issuer="www.oracle.com" MajorVersion="1" MinorVersion="1">
                <saml:Conditions NotBefore="2013-03-18T13:10:54Z" NotOnOrAfter="2013-03-18T13:15:54Z"/>
                <saml:AuthenticationStatement AuthenticationMethod="urn:ietf:rfc:1510" AuthenticationInstant="2013-03-18T13:10:55Z">
                    <saml:Subject>
                        <saml:NameIdentifier Format="urn:oasis:names:tc:SAML:1.1:nameid-format:unspecified">weblogic</saml:NameIdentifier>
                        <saml:SubjectConfirmation>
                            <saml:ConfirmationMethod>urn:oasis:names:tc:SAML:1.0:cm:sender-vouches</saml:ConfirmationMethod>
                        </saml:SubjectConfirmation>
                    </saml:Subject>
                </saml:AuthenticationStatement>
            </saml:Assertion> 
        </wsse:Security> 
    </soap:Header>
    <soap:Body xmlns:wsu="http://docs.oasis-open.org/wss/2004/01/oasis-200401-wss-wssecurity-utility-1.0.xsd" wsu:Id="Id-0001363612255582-000000007deffb30-2">
        <process xmlns="http://xmlns.oracle.com/SOAEcho/Echo/EchoProcess">
            <input>andre</input>
        </process>
    </soap:Body>
</soap:Envelope>


2.3 What to Sign

You can pretty much sign anything you want (theoretically). But the message usually has sensitive parts, like the assertion itself or some input element. These are the usual candidates to be signed. Here, we picked the Assertion and the whole Body.

WhatToSign

3. Generating the keystore

As we’ve seen, OAG signs the message with its private key stored in a java key store. OWSM will validate the signature using i) OAG’s certificate associated with that private key and ii) the root CA certificate signing OAG’s certificate. In this exercise, we used java keytool to generate a private key and a CSR (Certificate Signing Request) and used OpenSSL as the root CA to issue and sign the certificate.

Depending on your set up, you may have to tweak your openssl.cnf a bit. In Oracle Enterprise Linux, it’s located under /etc/pki/tls.

Or you can just execute the following commands after cd’ing to /etc/pki/CA. Notice that openssl.cnf has some relative references to /etc/pki/CA.

Openssl writes to two files called serial and index.txt (under /etc/pki/CA, by default), to name new certificates and keep track of issued certificates, respectively. Make sure to create them beforehand.

> echo 1000 > serial 
> touch index.txt

a) Using openssl, create a root CA certificate. The command below outputs a signing key (cakey.pem) and a certificate. Preferably, run openssl as root.

> openssl req -new -x509 -extensions v3_ca -keyout private/cakey.pem -out cacert.pem -days 365 -config ../tls/openssl.cnf

b) Using JDK’s keytool, create a private key for OAG server.

> keytool -genkey -alias orakey -keyalg RSA -keysize 1024 -dname "cn=db,dc=us,dc=oracle,dc=com" -keypass welcome1 -keystore keystore.jks -storepass welcome1

c) Using JDK’s keytool, create a CSR to be sent to your CA created in step a).

> keytool -certreq -v -alias orakey -file db.csr -keypass welcome1 -storepass welcome1 -keystore ./keystore.jks 
Certification request stored in file <db.csr> 
Submit this to your CA

d) Using openssl, issue and sign a certificate for the CSR

> openssl ca –config ../tls/openssl.cnf -in db.csr -out newcerts/db.pem

e) Using JDK’s keytool, import the root CA certificate into the keystore.

> keytool -import -v -trustcacerts -alias rootca -file cacert.pem -keystore keystore.jks -storepass welcome1

f) Using openssl, convert the generated certificate’s format do DER.

> openssl x509 -outform der -in newcerts/db.pem -out newcerts/db.der

g) Import the converted certificate into the keystore.

> keytool -import -v -alias oracert -file newcerts/db.der -keystore keystore.jks -keypass welcome1 -storepass welcome1

At this point ,you should have the following 3 entries in your keystore.jks file:

rootca, Mar 18, 2013, trustedCertEntry, Certificate fingerprint (MD5): 
E0:29:A8:F5:64:86:2C:A2:D7:12:7A:E1:99:DF:5F:94 
orakey, Mar 18, 2013, PrivateKeyEntry, Certificate fingerprint (MD5): 
E3:E5:FC:85:72:AC:69:1F:E0:B6:8C:24:0C:71:88:09 
oracert, Mar 18, 2013, trustedCertEntry, Certificate fingerprint (MD5): 
87:66:16:B5:7C:39:61:39:E1:11:1C:8D:C7:F9:16:FC

h) As you would not want to give away your private key, create a copy of the keystore, delete the orakey entry from the copy and have it available for OWSM in the OSB domain. OWSM will use oracert and rootca entries to validate the digital signature created by OAG.

At this point, we’re done with all necessary configuration in OAG. Let’s take a look at what needs to be done in OSB and SOA.


4. OWSM Configuration in OSB and SOA

4.1 Configure OWSM keystore in OSB and SOA

You do this either through EM (Enterprise Manager) or wlst. Here we present the EM option. If you have different domains for OSB and SOA (as in our case), perform this step in both of them.

Navigate to the Security Provider Configuration page, as per:

EM_securityProviderConfig_1

EM_securityProviderConfig_2

Click the Configure… button.

EM_keystore

In Keystore Path, enter the path to the keystore file you gave to OSB domain in step h) previously.

Key Alias and Crypt Alias have no bearing on validating incoming digital signatures. They are used by OWSM for signing and encrypting outgoing messages. The important thing here is configuring the keystore, which must contain the digital certificates for validating messages signed by OAG.

You need to restart your domain after doing this.


4.2 Attach the OWSM policy to OSB proxy service


OWSM_Policy-in-OSB3

See the policy name. After checking some SAML constraints, it validates message integrity and asserts the user against the configured identity store (unless you use the concept of virtual users, in which case the user in the SAML assertion is implicitly trusted.).

OSB has to be configured/extended with the OWSM Extension, otherwise, OWSM integration won’t be available.

Also make sure the OSB proxy is configured as a SOAP Passive Intermediary (Pass-Through), otherwise it will strip the SAML Assertion off.


4.3 Attach OWSM policy to SOA composite


OWSM_Policy-in-SOA3

When propagating the identity off the SOA composite, you need to attach a client side SAML policy in your web service references (BPEL partner links). SOA is never a SOAP Passive Intermediary. In other words, you must create a brand new SAML assertion in SOA if you want to preserve the end user identity all the way through in your business process.

All right, this is it for now.

In the fourth post of this series, we’ll cover the client part, how we actually submit requests with a Kerberos token to OAG.

OAM Federation: Identity Provider & Service Provider Management

$
0
0

In this blog post I want to clarify a point of initial confusion some people experience with OAM Federation 11.1.2.3. If we go to the “Federation” tab of the OAM Console, we see:

LaunchPadScreenShot

Now the two main objects you manage in your OAM Fed configuration are your IdP Partner definitions and your SP Partner definitions. So, I want to look at the IdP Partner definitions. Which link do I choose? The answer is, “Service Provider Management”. Conversely, to look at the SP Partner definitions, I click on “Identity Provider Management”. To many people, that at first seems back-to-front, but if you think about it some more, it makes perfect sense.

Let’s draw a diagram:

SAMLDiagram

Each Service Provider has a relationship with one or more Identity Providers, and each Identity Provider has a relationship with one or more Service Providers. The owner of each Service Provider has to decide which Identity Providers it is willing to work with, and the owner of each Identity Provider has to decide which Service Providers it is willing to work with. Each of these IdP-SP relations can only exist by mutual agreement of both ends; each side is trusting the other – the service provider needs to trust the identity provider to provide genuine user identities (i.e. only authenticate joe@example.com if it really is Joe); the identity provider needs to trust the service provider not to abuse the identities it is sent (e.g. to maintain the confidentiality of the user attribute data it is sent).

So the most important thing each IdP needs to know is – which SPs am I authorised to talk to? And the most important thing each SP needs to know is — which IdP am I authorized to talk to? So the SP Partners are part of the IdP configuration, and the IdP Partners are part of the SP configuration.

OAM Federation 11.1.2.3: Performing a Loopback Test

$
0
0

In this blog post I will share steps for performing a loopback test of OAM Federation 11.1.2.3. In a loopback test, we configure OAM’s SP to point to OAM’s IdP. This enables you to confirm the basic functionality of OAM Federation without requiring any external partner server. I also find it useful in plugin development – you can perform initial development of your plugin using just the OAM Federation server, since you might not have an instance of the intended partner server available in your development environment.

You can find instructions here on how to do the same thing in OIF 11.1.1.x federation. (Those instructions are for Fusion Apps, however the loopback test itself is identical for non-Fusion Apps environments.) You’ll find the steps in OAM 11.1.2.3 are very similar, the main difference being that OAM 11.1.2.3 uses OAM Console for configuration rather than Enterprise Manager. Also, while I have provided steps for OAM 11.1.2.3, the steps in 11.1.2.2 are very similar (the configuration screens themselves are similar, but the navigation paths to reach them are different).

A couple of prerequisites:

  • you need OAM 11.1.2.3 installed. I used the Lifecycle Management Tools Deployment Wizard — see 11.1.2.3 IAM Deployment Guide
  • you need the “Identity Federation” service enabled. If it is not already enabled, you can go to oamconsole > Configuration tab > Available Services. (Hint: if it is disabled yet the “Enable Service” link is greyed out, try disabling then re-enabling “Mobile & Social”).

Download the metadata

OAM’s IDP metadata is available using the URL: http://OAMHOST:OAMPORT/oamfed/idp/metadata

Download that and save it to a file.

You can also download the SP metadata from the URL: http://OAMHOST:OAMPORT/oamfed/sp/metadata

However, what you will discover, is they are basically the same thing, with only the ID, timestamps, and digest/signature values different. To see this, run each XML file through xmllint –format, and then diff the results.

Hence, in OAM Federation’s case, we can treat the two sets of metadata interchangeably, and only need to save the one file.

Next we need to create LoopbackIDP

oamconsole > Federation tab > under “Federation” select “Service Provider Management”
Click on “Create Identity Provider Partner”:

Fill in the following data:

  • Name: “LoopbackIDP”
  • “Enable Partner” will be checked by default
  • Select protocol “SAML2.0”, browse to the metadata XML file you saved previously
  • Under “User Identity Store” you can select “OAMIDSTORE”.
  • You can leave the other mapping settings, e.g. “Map assertion Name ID to User ID Store attribute”, to their defaults. Basically, you can use whatever attribute you want, provided you have that attribute defined and unique for your test users, and you make the same configuration at the other end.

Click Save – LoopbackIDP will be created.


Now to test this, let’s use the SP test page:

The SP Test page can be accessed via: http://OAMHOST:OAMPORT/oamfed/user/testspsso


initially this screen will display “System Error”.

If you look at the logs (e.g. wls_oam1-diagnostic.log) you will see:

oracle.security.fed.event.EventException: SP Engine error - the Test SP Engine is not enabled
at oracle.security.fed.eventhandler.fed.authn.engines.testsp.TestSPRetrieveInformationEventHandler.perform(TestSPRetrieveInformationEventHandler.java:77)

Solution: you need to run the configureTestSPEngine("true") command in WLST:

  • Start WLST:
 $IAM_ORACLE_HOME/common/bin/wlst.sh
    • Note that there are multiple copies of WLST installed. You need to use the copy under the $IAM_ORACLE_HOME, since that copy has the configureTestSPEngine() command configured. The other copies of WLST installed in the other homes (oracle_common, wlserver_10.3) will lack this command, and the other OAM-specific commands.
  • Connect to the WLS Admin server:
 connect()

Enter the username (e.g. weblogic) ,password & Admin Server URL (e.g. t3://myadminserver.example.com:7001 )

  • Navigate to Domain Runtime branch:
domainRuntime()
  • Execute the configureTestSPEngine() command: configureTestSPEngine(“true”)


Now we try again:

Choose partner “LoopbackIDP” and “Start SSO”.

Once again we get a “System Error”. Looking at the logs:

<Error> <oracle.security.fed.jvt.JVTDiscoveryManager> <FEDSTS-12014> <Discovery Finder Exception: unable to locate object in the repository: {0}
oracle.security.fed.jvt.discovery.exceptions.DiscoveryFinderException: Missing partner configuration for: http://OAMHOST:OAMPORT/oam/fed
at oracle.security.fed.jvt.discovery.model.config.ConfigServiceDiscoveryProvider.getPartnerConfig(ConfigServiceDiscoveryProvider.java:1043)
at oracle.security.fed.jvt.discovery.model.config.ConfigServiceDiscoveryProvider.locateProtocolConfiguration(ConfigServiceDiscoveryProvider.java:910)
at oracle.security.fed.jvt.discovery.model.config.CSFConfigDiscoveryProvider.locateProtocolConfiguration(CSFConfigDiscoveryProvider.java:134)
at oracle.security.fed.jvt.discovery.model.config.ChainingConfigDiscoveryProvider.locateProtocolConfiguration(ChainingConfigDiscoveryProvider.java:42)
at oracle.security.fed.jvt.discovery.model.config.CachingConfigDiscoveryProvider.locateProtocolConfiguration(CachingConfigDiscoveryProvider.java:75)
at oracle.security.fed.jvt.JVTDiscoveryManager.locateProtocolConfiguration(JVTDiscoveryManager.java:1956)

This is because we have configured “LoopbackIDP” as an IDP partner in the SP configuration, but we have not configured the SP as an SP partner in the IDP configuration. Let us do that now:

Next we need to create LoopbackSP

oamconsole > Federation tab > under “Federation” select “Identity Provider Management”

Click on “Create Service Provider Partner”:

Fill in the following data:

  • Name: “LoopbackSP”
  • “Enable Partner” will be checked by default
  • Select protocol “SAML2.0”, browse to the metadata XML file you saved previously
  • For “NameID Format” you can use the default of “Email Address”. For “NameID Value” you can use “User ID Store Attribute” of “mail”.
  • Other settings can be left at their defaults.

Click Save – LoopbackSP will be created.


Now let’s repeat the test with the test SP app:

Having tested this with an SP app, we can now do the same test using a protected page:


  • In oamconsole, go to Federation tab, Federation tile, Service Provider Management
  • Search for LoopbackIDP and open it
  • Click “Create Authentication Scheme and Module”

This will create an Authentication Module called LoopbackIDPFederationPlugin and an Authentication Scheme called LoopbackIDPFederationScheme

  • Go to your OHS htdocs directory — if you used LCM installation, this is $IDMTOP/config/instances/ohs1/config/OHS/ohs1/htdocs
  • Create a directory called fedtest
  • Inside fedtest create a file called index.html, add some content e.g. “<h1>Hello World!</h1>”
  • In OAM Console, go to “Application Security” tab, “Access Manager” tile, “Application Domains” link:

  • Then press “Search”:
  • Open “IAM Suite”:
  • Go to “Authentication Policies” tab, and click “Create”:

  • On the “Create Authentication Policy” screen, enter name “LoopbackIDPAuthPolicy” and select “Authentication Scheme” of “LoopbackIDPFederationScheme”. Then click “Apply”.

Go back to the “IAM Suite” tab, then select the “Resources” subtab. Click “Create”:

Choose resource type of “HTTP”, host identifier of “IAMSuiteAgent”, Resource URL of /fedtest/…/*


And protection level of “Protected”, with “Authentication Policy” of “LoopbackIDPAuthPolicy” and “Authorization Policy” of “Protected Resource Policy”

Click Apply


  • Now finally to test: open a new Private Browsing Window, and navigate to http://OAMHOST:OAMPORT/fedtest/index.html . You should get redirected to the login page, and you should see /oamfed/idp/samlv20 in the address bar of the login page. This shows we are using SAML. Then login and you should see the message “Hello World!”


OAM Federation 11.1.2.3: Example Message Processing Plugin

$
0
0

SAML is an extensible protocol. Since it is based on XML, through the use of XML namespaces, custom elements and attributes can be inserted into the SAML messages at the appropriate places. Sometimes third party or custom SAML implementations will require particular custom elements or attributes to function.

In this example, we will suppose an IdP requires a custom <CompanyInfo> element included in the SAML extensions to provide the name of the company issuing the SAML request:

<samlp:Extensions xmlns:samlp="urn:oasis:names:tc:SAML:2.0:protocol">
<CompanyInfo xmlns="http://example.com/samlext/1.0"
       CompanyName="Example Corporation" />
</samlp:Extensions>

(This case is based on a real customer scenario; I’ve changed the XML to simplify it and to respect that customer’s confidentiality.)

In 11.1.2.3 this is possible using OIFMessageProcessingPlugin. Note that only one plugin is allowed in your OAM environment, but since the plugin is passed information on each message (e.g. name of the partner it is for, whether it is incoming or outgoing, etc), you can use conditional logic in your plugin to do different things for different messages.

This tutorial assumes you have set up OAM Federation loopback test (LoopbackIDP/LoopbackSP) per the previous post. This enables us to initially test the plugin without requiring the third party server expecting the custom elements to be available. (Of course, once you believe you have it working without the third party server, you’d want to test it with them.)

DISCLAIMER: This sample code is just a start for your own development process, it is not production quality. This is a sample only, not officially supported by Oracle, use at your own risk.

Build the example plugin

We need our Java code for our plugin. Create a directory anywhere, let us refer to it as $PLUGINDEV. Then create the directory tree $PLUGINDEV/src/oracle/ateam/msgprocplugin and in that directory place the file SampleMsgProcPlugin.java with the following content:

package oracle.ateam.msgprocplugin;

import java.io.*;
import java.util.*;
import javax.xml.parsers.*;
import oracle.security.am.plugin.*;
import oracle.security.fed.plugins.fed.msgprocessing.*;
import org.w3c.dom.*;
import org.w3c.dom.ls.*;
import org.xml.sax.*;
import static java.lang.System.err;

public class SampleMsgProcPlugin extends OIFMessageProcessingPlugin {

        private boolean monitoringStatus;

        public ExecutionStatus process(MessageContext messageCtx) throws MessageProcessingException {
                try {
                        String msg = "";
                        msg += "************************************\n";
                        msg += "* SAMPLE MESSAGE PROCESSING PLUGIN *\n";
                        msg += "************************************\n";
                        msg += "Partner Name: " + messageCtx.getPartnerName() + "\n";
                        msg += "Message Type: " + messageCtx.getMessageType() + "\n";
                        msg += "Message Version: " + messageCtx.getMessageVersion() + "\n";
                        msg += "User DN: " + messageCtx.getUserDN() + "\n";
                        msg += "User ID: " + messageCtx.getUserID() + "\n";
                        msg += "User ID Store: " + messageCtx.getUserIDStore() + "\n";

                        // Determine if this message meets our criteria for modification
                        boolean matches =
                                "LoopbackIDP".equals("" + messageCtx.getPartnerName()) &&
                                "SSO_AUTHN_REQUEST_OUTGOING".equals("" + messageCtx.getMessageType()) &&
                                "SAML2.0".equals("" + messageCtx.getMessageVersion());

                        if (!matches)
                                msg += "@@@@@@ CRITERIA NOT MET - SKIPPING THIS MESSAGE @@@@@@\n";
                        else {
                                msg += "@@@@@@ CRITERIA MET - TRANSFORMING THIS MESSAGE @@@@@@\n";
                                Element root = parseXML(messageCtx.getMessage());
                                String pretty = unparseXML(root);

                                msg += "---------- ORIGINAL XML -----------------\n";
                                msg += "\n" + pretty + "\n";

                                // Now to modify the XML message
                                Element ext = getExtensionsXML();
                                root.appendChild(root.getOwnerDocument().importNode(ext,true));

                                // DOM tree modified - unparse the DOM back into string
                                messageCtx.setModifiedMessage(unparseXML(root));

                                msg += "---------- MODIFIED XML -----------------\n";
                                msg += "\n" + messageCtx.getModifiedMessage() + "\n";
                        }

                        msg += "=================ENDS===================\n";
                        err.println(msg);
                        return ExecutionStatus.SUCCESS;
                } catch (Exception e) {
                        e.printStackTrace();
                        throw handle(e);
                }
        }

        @Override
        public String getDescription(){
                return "Sample Message Processing Plugin";
        }

        @Override
        public Map<String, MonitoringData> getMonitoringData(){
                return null;
        }

        @Override
        public boolean getMonitoringStatus(){
                return monitoringStatus;
        }

        @Override
        public String getPluginName(){
                return "SampleMsgProcPlugin";
        }

        @Override
        public int getRevision() {
                return 123;
        }

        @Override
        public void setMonitoringStatus(boolean status){
                this.monitoringStatus = status;
        }

        private RuntimeException handle(Exception e) {
                return e instanceof RuntimeException ? (RuntimeException)e : new RuntimeException(e);
        }

        private DocumentBuilderFactory createDBF() {
                try {
                        Class<?> c = Class.forName("com.sun.org.apache.xerces.internal.jaxp.DocumentBuilderFactoryImpl",true,ClassLoader.getSystemClassLoader());
                        return (DocumentBuilderFactory) c.newInstance();
                } catch (Exception e) {
                        throw handle(e);
                }
        }
        
        private Element parseXML(String xml) {
                try {
                        DocumentBuilderFactory dbf = createDBF();
                        dbf.setNamespaceAware(true);
                        DocumentBuilder db = dbf.newDocumentBuilder();
                        StringReader sr = new StringReader(xml);
                        InputSource is = new InputSource(sr);
                        Document doc = db.parse(is);
                        return doc.getDocumentElement();
                } catch (Exception e) {
                        throw handle(e);
                }
        }

        private DOMImplementationSource getDOMImpl() {
                try {
                        Class<?> c = Class.forName("com.sun.org.apache.xerces.internal.dom.DOMXSImplementationSourceImpl",true,ClassLoader.getSystemClassLoader());
                        return (DOMImplementationSource) c.newInstance();
                } catch (Exception e) {
                        throw handle(e);
                }
        }

        private String unparseXML(Node node) {
                try {
                        Document doc = node.getOwnerDocument();
                        DOMImplementationSource reg = getDOMImpl();
                        DOMImplementationLS ls = (DOMImplementationLS) reg.getDOMImplementation("LS");
                        LSSerializer w = ls.createLSSerializer();
                        w.getDomConfig().setParameter("format-pretty-print", Boolean.TRUE);
                        w.getDomConfig().setParameter("xml-declaration", Boolean.TRUE);
                        String ppxml = w.writeToString(doc);
                        return ppxml.replace("<?xml version=\"1.0\" encoding=\"UTF-16\"?>","<?xml version=\"1.0\" encoding=\"UTF-8\"?>");
                } catch (Exception e) {
                        throw handle(e);
                }
        }

        private Element getExtensionsXML() {
                String extensionsXML = "";
                extensionsXML += "<samlp:Extensions xmlns:samlp=\"urn:oasis:names:tc:SAML:2.0:protocol\">\n";
                extensionsXML += "        <CompanyInfo xmlns=\"http://example.com/samlext/1.0\"\n";
                extensionsXML += "             CompanyName=\"Example Corporation\" />n";
                extensionsXML += "</samlp:Extensions>\n";
                return parseXML(extensionsXML);
        }

        private Element getChildElem(Node node,String nsuri, String name) {
                try {
                        NodeList kids = node.getChildNodes();
                        for (int i = 0; i < kids.getLength(); i++) {
                                Node k = kids.item(i);
                                if (k.getNodeType() != org.w3c.dom.Node.ELEMENT_NODE) continue;
                                if (!Objects.equals(k.getNamespaceURI(),nsuri)) continue;
                                if (!Objects.equals(k.getLocalName(),name)) continue;
                                return (Element)k;
                        }
                        return null;
                } catch (Exception e) {
                        throw handle(e);
                }
        }
}

Question: Why do I get the DOM factory objects directly from the System Class Loader using Class.forName?

Answer: I tried doing it the normal way, but OAM overrides the standard JDK XML classes with some Oracle-specific ones that don’t implement DOM 3 Load and Save. So by doing it this way I make sure I get an XML implementation that has the features I need.

Next we need to create the XML plugin manifest $PLUGINDEV/SampleMsgProcPlugin.xml:

<?xml version="1.0"?>
<Plugin type="Message Processing">
  <author>Oracle A-Team</author>
  <email>donotreply@oracle.com</email>
  <creationDate>2015-04-16 12:53:37</creationDate>
  <description>Sample Message Processing Plugin</description>
  <configuration>
  </configuration>
</Plugin>

Here we could, if we so wished, define some configuration settings for our plugin, that could then be modified using the OAM Console. However, in this simple example, we have not done that.

Next we need to create $PLUGINDEV/MANIFEST.MF file:

Manifest-Version: 1.0
Bundle-ManifestVersion: 2
Bundle-Name: SampleMsgProcPlugin
Bundle-SymbolicName: SampleMsgProcPlugin
Bundle-Version: 1
Bundle-Activator: oracle.ateam.msgprocplugin.SampleMsgProcPlugin
Import-Package: javax.xml.parsers,oracle.security.am.plugin,oracle.security.fed.plugins.fed.msgprocessing,org.osgi.framework;version="1.3.0",org.w3c.dom,org.w3c.dom.ls,org.xml.sax
Bundle-RequiredExecutionEnvironment: JavaSE-1.6

This is the OSGi bundle metadata. Notably, it lists the Java packages our plugin requires. (Note that Import-Package is all on one-line.)

Next we need to create $PLUGINDEV/compile.sh file:

#!/bin/bash
DOMAIN_HOME=/idmtop/config/domains/IAMAccessDomain
SERVER_NAME=wls_oam1

JARS="$(find $DOMAIN_HOME/servers/$SERVER_NAME/tmp/_WL_user/oam_server_11.1.2.0.0/ -name fed.jar -o -name oam-plugin.jar -o -name felix.jar | tr '\n' ':' | sed -e 's/:$//')"
SRCS="$(find src -name '*.java')"
rm -rf build
mkdir build
javac -d build -classpath $JARS $SRCS
cp SampleMsgProcPlugin.xml build
mkdir build/META-INF
cp MANIFEST.MF build/META-INF
cd build
jar cvmf META-INF/MANIFEST.MF ../SampleMsgProcPlugin.jar *

This shell script compiles the plugin for us. (Of course, one should use something like ANT or Maven instead, but for our simple example a shell script will do.) Note the path DOMAIN_HOME and the SERVER_NAME may need to be changed for your environment. Also note that JARS= is supposed to all be on one line (in case your web browser is wrapping it).

Finally we run compile.sh to create SampleMsgProcPlugin.jar.

Deploy the example plugin

Login to OAM Console

Go to “Application Security” tab

In “Plug-ins” section select “Authentication Plug-ins”:

Note: Even though the label says “Authentication Plug-ins”, the same screen works for non-authentication types of plugins, such as the message processing plugin in this case.

Click “Import Plugin”:

Upload “SampleMsgProcPlugin.jar” you built in earlier step and click “Import”:

Refresh the table and search for the new plugin:

Click “Distribute Selected”, then click Refresh icon to see status has changed to “Distributed”:

Now click “Activate Selected”, then click Refresh icon to see status has changed to “Activated”:

Enabling message processing plugin

The plugin has now been installed. Now we need to tell OAM Federation to use it. Edit the $DOMAIN_HOME/config/fmwconfig/oam-config.xml file. Look for the “fedserverconfig” section:

In that section, look for a setting called “messageprocessingeplugin”:

Change its value to the name of your plugin:

Also, in the same section, look for a setting called “messageprocessingenabled”:

Change that from “false” to “true”.

Finally, near the top of the file, look for a version number:

Increment that number by 1, and save. (It doesn’t matter by how much you increment it, so long as the new version number is higher than the old one.)

Now check the oam-config.ref file in the same directory:

When the version number in that file has increased to the new number in the oam-config.xml, you know the new number has been loaded.

Testing the new plugin

Go to the SP Test Page (http://OAMHOST:OAMPORT/oamfed/user/testspsso). This assumes you have enabled it per my previous post. Test using LoopbackIDP. As you test, watch SAML messages using e.g. SAML Tracer plugin in Firefox [https://addons.mozilla.org/en-us/firefox/addon/saml-tracer/]. You should see the custom XML extension in the SAML AuthnRequest in SAML Tracer:

Also note the custom plugin writes to the wls_oam1 console log every time it runs:

You would probably not want to do this in Production, but it is helpful in development. And you’d want to make it log through java.util.logging not System.err.println. Remember this sample code is just a start for your own development process, it is not meant to be production quality.

Viewing all 31 articles
Browse latest View live